Fun with prototyping, Part 2

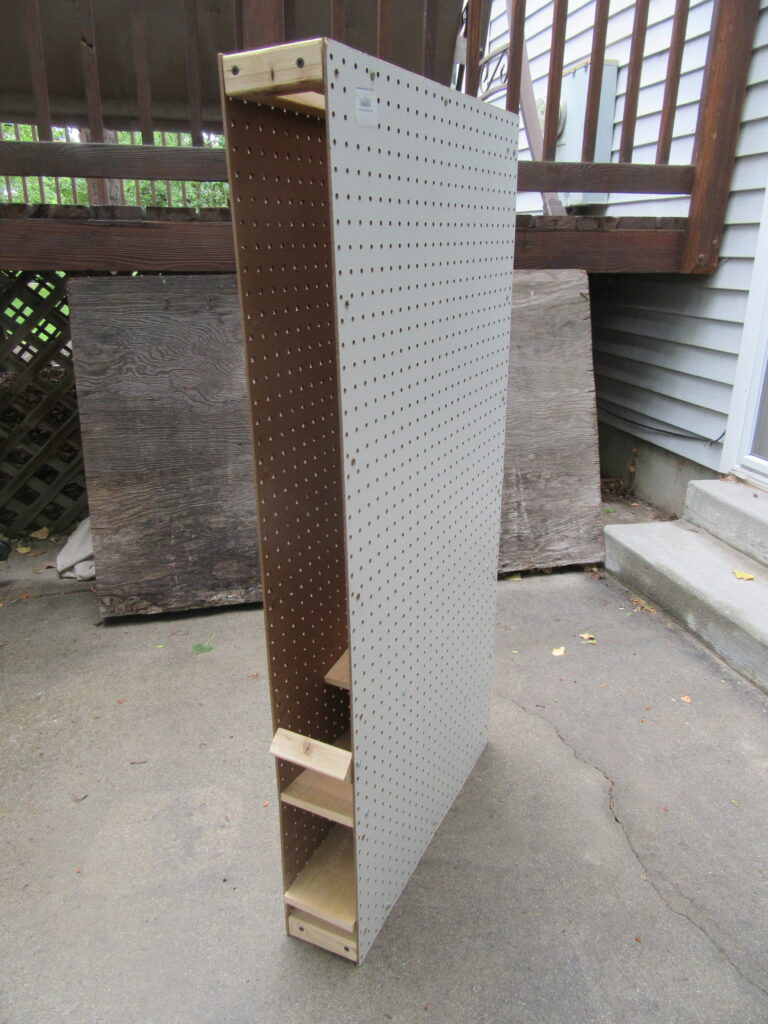
I was able to get out and work on my canned goods storage/rotation system this weekend and finished my prototype unit. Here’s how it turned out:

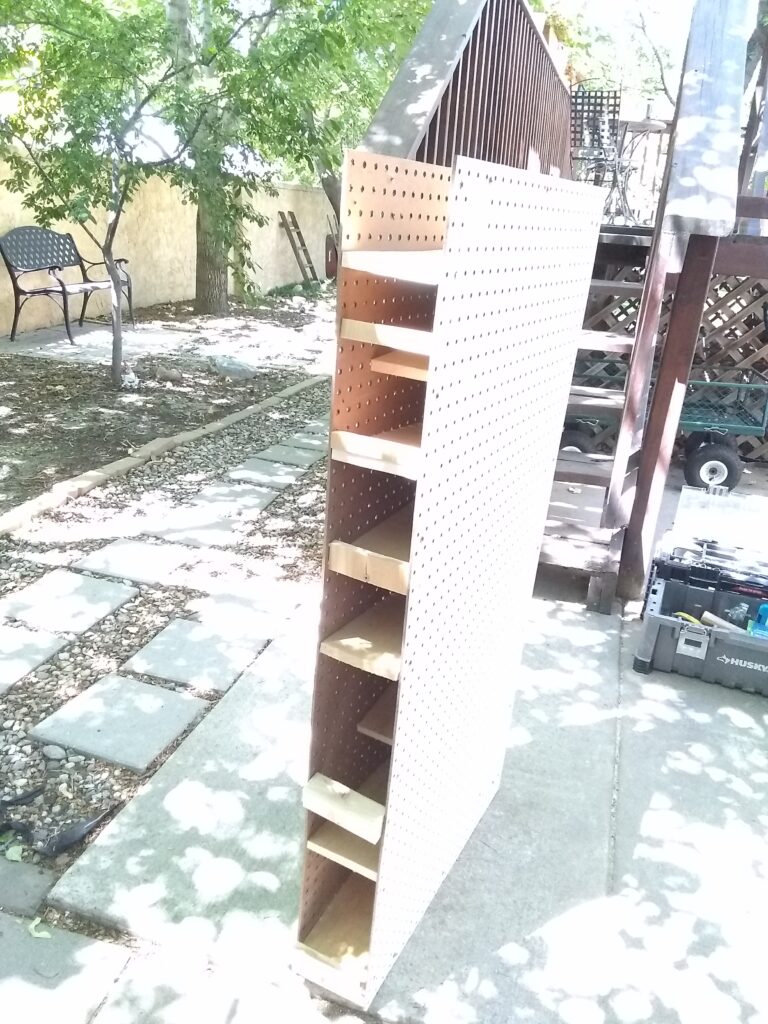
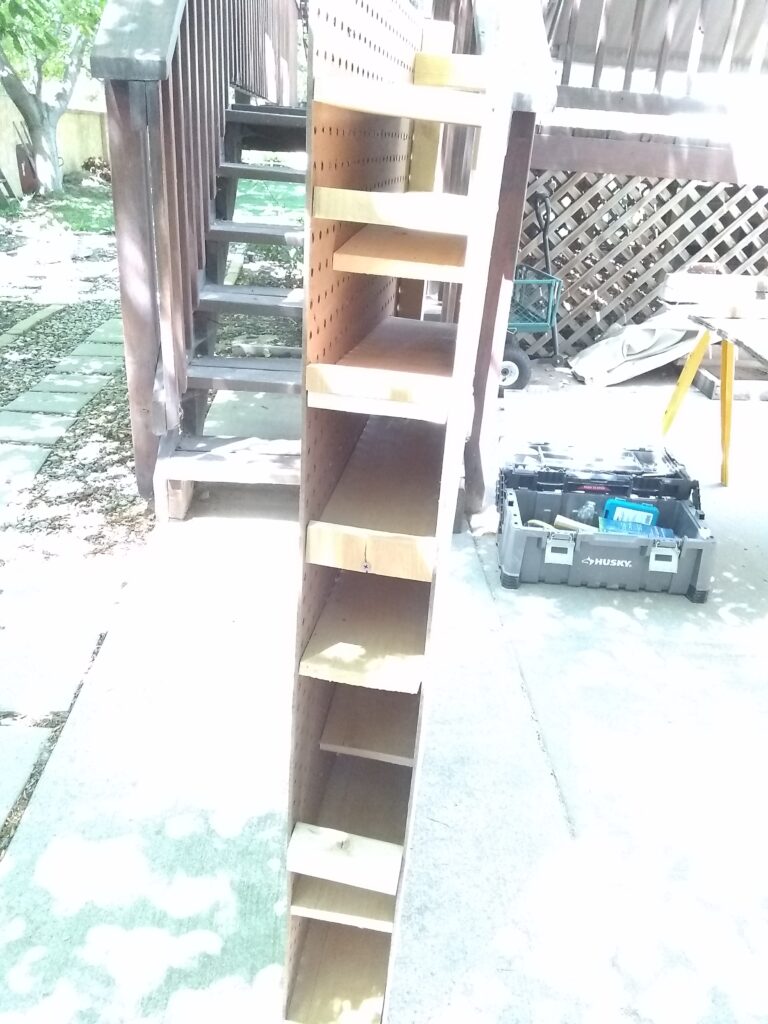
The pictures aren’t the best; my apologies. As you can see, though, it’s still rough, still…a prototype.

What I ended up with holds two types of cans, 28 oz. cans in the lower half, 14.5 oz. cans in the upper half. I did this because it was clear after the first half that I wouldn’t be able to fit four more levels of the 28 oz. cans in my unit, so I decided to try how many levels of the smaller cans would fit.

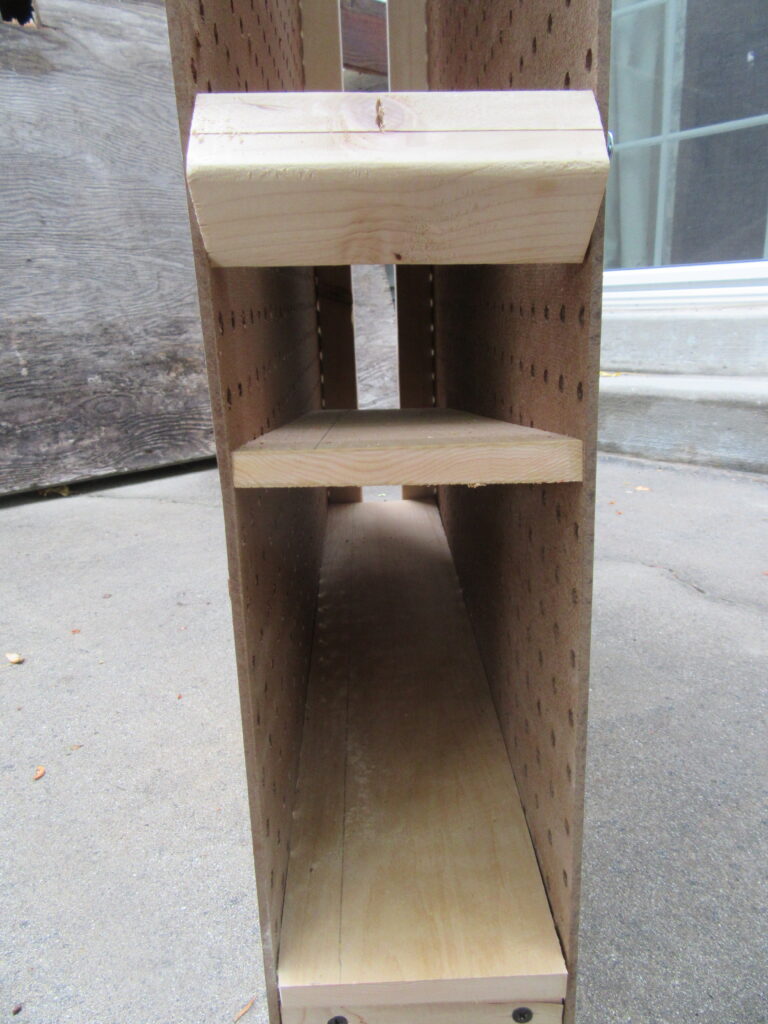
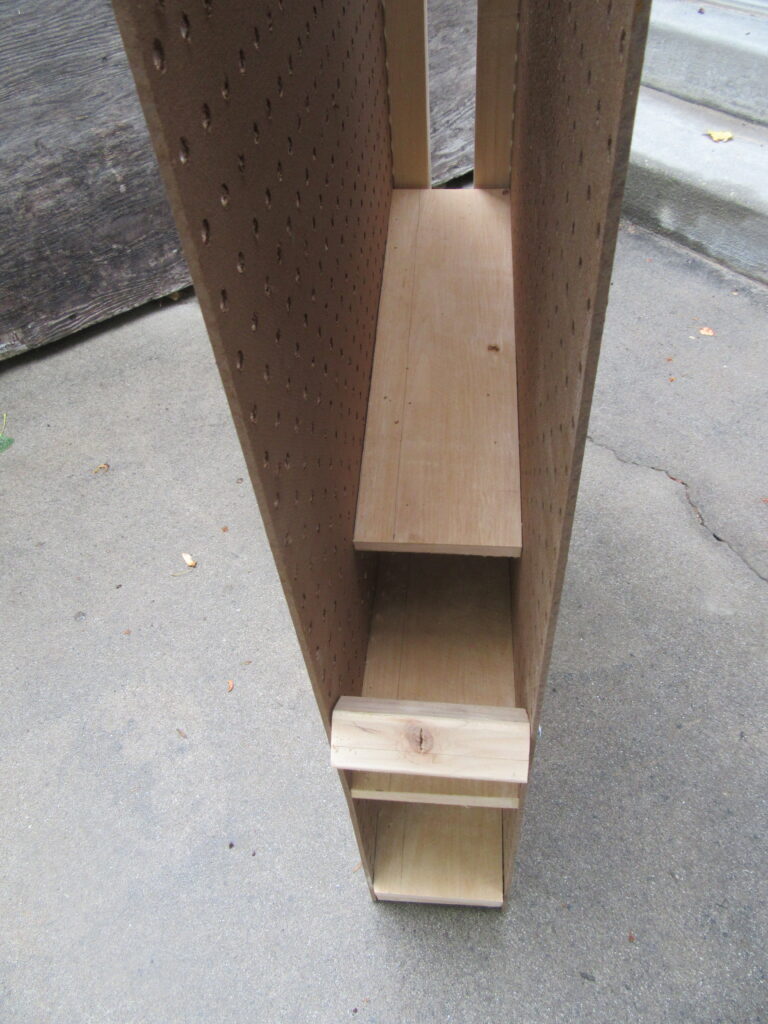
I realized pretty quickly that I would not be able to fit four levels of smaller cans in the remaining space. At that point I was slanting the shelves at a 2-inch slant front-to-back, so I tried reducing that to a 1-inch slant. I also lowered a few of the bigger can shelves to that slant as well. As it was, I still couldn’t make it all fit. There wasn’t room to put the cans in at the top, as there was still the 2×2″ support beams across the top, even when I tried laying the very top shelf flat instead of the usual slant.

Next I tried taking the 2×2’s out, figuring at that point I had enough shelves screwed in across the sides to stabilize the unit. That worked. I suppose at that point I could/should have added a slant to the top shelf, but I didn’t. I was more concerned about how well the unit would hold up.

My next step was to take the unit down into our basement and see how many cans I could fit in it, if the gravity feed would work correctly, and if it would hold up. Sorry I didn’t get pictures of that. But I can tell you that the bottom half holds 20 of the larger cans. It does have some difficulties feeding, which I will need to work out. It’s not a big deal, but it does involve reaching into the unit to clear the blockages.

As far as the smaller cans, the upper section held twelve of those just in the first two shelves, with room for at least one more. I didn’t add more, as I didn’t want to add a different vegetable at that point. Not having a slant on the top shelf is an annoyance, as you have to manually push the cans to the back before they begin to feed. I’ll definitely have to fix that, as my current plan for the storage room will put that shelf up near the ceiling, making it hard to push.

All in all, the unit was sturdy enough to hold the weight. If anything, loading it with cans made it more sturdy. The feeding is the primary issue. The transition from an upper shelf to a lower shelf is one issue that can likely be addressed in the next iteration.

The other problem is that the cans rub against the sides and the friction slows them down or stops them altogether. For that I blame the materials I’m using, at least for now.

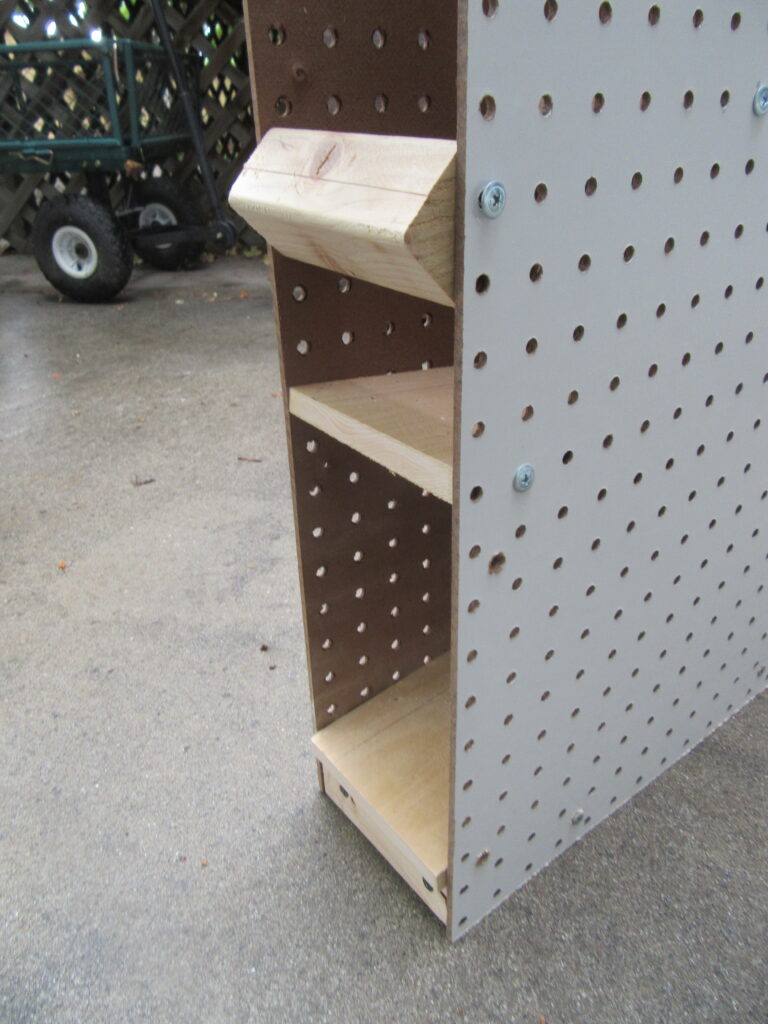
Pegboard has two sides, a white, smooth side and a brown rough side. I went for appearances and put the smooth side out. In reality, when these are lined up next to other units you won’t even see the outside surface. On the next test I’ll put the smooth side inside, which should reduce the friction against the cans. When the slant on the shelves was 2″ the friction wasn’t nearly as big an issue, but reducing that to 1″ lessens the pull of gravity. I don’t think I can get by making the slant steeper, so I’ll have to find other ways to help overcome friction from the sides.

A third issue, related to the second, was that occasionally the shelves were too narrow, and when screwed into the sides they pulled the sides in too much, narrowing the passage enough to catch the cans. I hope to have better tools by the time I try the next prototype and be able to get more uniform cuts to my wood.

I’m still impressed with the versatility of the pegboard. The ability to see through the walls, so to speak, is invaluable, as is the ability to move shelves around without having to drill new holes in the walls. I’m hoping to find a way to position the screw holes in the sides of the shelves more uniformly in the future as well so the shelves will be more level side-to-side.

I also plan to experiment with having less support structure. If I cut the shelves uniformly they should provide lots of stability to keep the tower from leaning. I may be able to get by using 1×2″s along the back instead of 2×2″s without losing any stability, and at this point I’m not sure I even need any support along the bottom and top edges, which may open up more vertical space for shelving. I’m really hoping I can make this work with good efficiency using standard sizes (ie. 2’x4′ pegboard panels) to minimize waste. If I have to make each unit 4.5 to 5 feet tall, for example, I’ll have to cut 4’x8′ sheets to size, which will waste the last three feet of pegboard.

The biggest success I’m seeing so far is the potential efficiency in storage and rotation. While a series of shelf a la Donkey Kong isn’t entirely efficient, it’s more efficient than standard shelves. Being able to line these units up side by side will increase our storage capacity considerably, and make rotation much less work. I’m excited to move on to Phase Two of this project in finalizing the design I’ll then start “mass producing,” as well as getting a final idea of cost. It appears so far that I’m spending about $30-35 per unit, but I’m hoping to pin that down tighter.

Stay tuned!

Stock-up items

In many ways the shortages we experienced a few months ago are fully in the review mirror. One might be inclined to think we’re out of the woods, so to speak. And yet every time my wife comes home from a grocery run she tells me about one or more items that she can’t find anymore, has to buy a different brand, or has to buy a different way.

For example, today she came home with a #10 can of diced tomatoes. Normally she gets the 16 oz. or 28 oz. cans, but today there wasn’t a single can in sight, except for the #10 can. Not a problem for her–she usually freezes the remains of the 28 oz. cans anyway. But now I have to wonder: is there about to be a total shortage of diced tomatoes? Should she have picked up another can while there still are some to be had?

Well, probably not, because we already have a several-month supply of the usual cans. But there are other things, like the particular brand of peanut butter we love, that wasn’t in stores for at least a month a while back, was back for a few weeks, and now seems to be gone again.

Daisy Luther, over at The Organic Prepper, suggests we should be looking ahead with the idea that more shortages could happen at any time. And with the recent resurgence of COVID-19 cases nationally, she may not be wrong. The supply chain was interrupted quite a bit the first time around, when infection rates were considerably lower. Another shut-down of the country could have even bigger impact.

With that in mind, she recommends that we prepare now, by picking up regularly the items most likely to disappear quickly if more shortages comes our way. Every time you go to the store, even if you already have some at home, consider adding more of the following:

You may also want to consider any items specific to your situation, such as baby supplies, pet supplies, or for specific dietary or medical needs. You can also stock up more slowly on other items like paper towels and cleaning supplies (especially disinfectant sprays).

She also recommends saving up some emergency funds, stocking up on supplies for various regular projects (both for work activities and for entertainment), beefing up your home office, and picking up any other items you found yourself wishing you had during the last lockdown. Make sure you have what you need to do most basic repairs around the house.

Wouldn’t it be great if the Coronavirus fades away, the riots end, and the rest of 2020 is free of trouble? Nothing would please me more. But in case it doesn’t, it wouldn’t hurt to not get caught off guard next time.

Fun with prototyping

Storing canned goods is pretty much a given in any long-term food storage program. Storing them so you can rotate them easily, however, is something of a trick. I’ve heard of and seen of can storage racks where you feed them in at the top and they roll down a series of ramps to the bottom so you they’re automatically sorted for rotation. I’ve been thinking for years of how to make some for our storage room, but the thought of trying to figure out all the measurements and angles, rout out perfect grooves, and make sure they actually feed through the system properly has left my head hurting.

Ever since I re-started this blog and got serious about self-reliance again I’ve been devoting a fair amount of mental bandwidth to the problem again. Those gravity-feed can stackers are nice, but they don’t use space as efficiently as they might. But then, neither do most storage shelves. There’s always empty, unused space. And anything I build is going to be a bit pricey. Is there a cheaper way? Is there a way to experiment?

Well, I finally solved the last question. It dawned on me this week that pegboard is amazingly reusable, and sturdy enough to prototyping at the very least. I picked up some materials this weekend and got to work designing a test rack.

After getting the dimensions of several different types of cans I set to work building the frame for a single rack from two 2’x4′ pegboards and some 2″x2″ studs. It didn’t take long before I made my first mistakes. Fortunately they were easily remedied and I was able to move on to the next phase.

Cedar fence boards are my go-to disposable wood. When my wife and I became Cub Scout leaders I was able to design a bird house using 6″ fence boards, and I was able to get two bird houses out of a single $2.00 board (prices have gone up since then). For this project, where I needed shelves exactly 4.75″ wide, which is too wide for most boards, and far too thin for others. But a 6″ cedar board can cut down to size with little waste, and are thick enough to put screws into the side of it.

So after trimming some fence board down to the right width, I started experimenting with properly sizing and positioning the shelves within the frame, starting from the bottom. That shelf would need to slope toward the front. The next shelf above that would need to slope toward the back of the unit, with enough a gap at the back to allow cans to fall down onto the back of the lowest self. Getting the slope right is the main issue. Too shallow and cans don’t roll. Too steep and you take up more space than needed (and could potentially propel cans right out the front of the unit).

Here’s where what I like to think of as the genius of my idea came into play. Using pegboard for the sides I didn’t have to drill a bunch of holes, and could easily see where the shelves were within the frame. I could then use the existing peg holes, and put a screw through the hole into the shelf to hold it in place. If, upon testing, the angle was wrong, I could remove the screw, raise the shelf to a better angle, and put the screw into the board through a different peg hole at the right spot. It’s about as flexible a system as I could contrive with standard materials.

I didn’t quite get as far as I wanted this weekend. My test model only has three shelves, so I have to feed from the back of the top shelf until I get the fourth in place. With a little luck I should be able to get two sets of four shelves in a single unit, but that’s still a ways off. I’m not completely thrilled with how the first run is turning out, and I’m finding some issues with my choice of materials (cedar boards warp REALLY easily) that may account for why the cans don’t roll consistently from top to bottom without getting stuck. The consolation there is that my open design makes it easy to reach in and push the cans when needed.

As I continue to work with my test frame I’ll keep you posted. If I’m pleased enough with the outcome to where I think I’m ready to “mass produce” these I’ll perhaps post some blueprints, or at least more detailed photos.

EDIT: Sneaked out and got a few pics of the test frame:

Just how much DO we need?

So, let’s talk about toilet paper. It was very much in the news not three months ago, and now we hardly hear about it. How many of us have already slipped back into our old habits of not keeping more than enough to get us through to the next shopping trip?

Ever since we got caught with our pants down (seldom has an expression been more appropriate and inappropriate at the same time!) our household has vowed “Never again!” It’s not that we didn’t have enough on hand, mind you. It’s just that, because of everyone else panicking, we were forced to see just how long our supplies would last, and while it lasted close to a month, we were getting pretty darn close when the wheels of commerce ground to the rescue.

So what have we done since? Well, to start with we had to, like most of America, do be patient. Initially we could get more, but in limited quantites, and not in our usual brand. We were a bit dismayed to find that what we could get, while certainly cushier, was so thick that there was only about a day’s worth on a single roll, perhaps a little more. Just holding the line was a bit dicey.

But now that things are getting back to normal, our usual brand is available again and life is good. We also have about three different brands in our growing TP reserves, which we are building up slowly, so as not to appear panicked. And, sadly, some of that reserve still includes some of the one-day rolls. And with a variety of rolls still in circulation, it’s been difficult to measure just how much we’re using.

Solution? White board marker on the bathroom mirror! Every time we change a roll we record the date on the mirror. After a couple weeks we have enough data to start making estimates. It appears that we average a new roll every four days, +/- a day. Divide that into 365 days, and we need about 91 rolls of our usual brand to stock that bathroom for a year. We still need more data on the other bathrooms in our house, but I suspect that even combined they won’t use more than our main bathroom.

So all told, we probably would need 180 rolls to last us a year. Hopefully we would never need that much, but it’s not like TP is perishable. It’s easy to rotate (’cause it goes round and round on the holder, get it?!), so having too much isn’t really a problem, so long as we take our time building up that much. More likely we would start with half a year and see how that goes. But provided we have the storage space (we do) and are willing to keep track, we should be able to rest easy next time the cr– …. uh, the next time people start going crazy.

Experiments in document destruction

I am hard on paper shredders. I’ve destroyed two of them in the past year. I like to think it’s just because those diamond-cut shredders are flimsy, but I suspect it’s really because I push the limits a little too often. In any case, I recently cleaned out the shed and found I had three boxes full of old financial docs, dating back twenty years. That’s way longer than I need, and is perhaps even becoming a liability. But…I don’t have a shredder.

My wife suggested I look up other ways of destroying documents, so I did. I don’t think a burn-barrel would go over too well these days, but a soak barrel sounded interesting. The idea is to get a bucket of water and dump your documents in there, let them soak, then stir them well to break them up and turn them to pulp. Then you pour the pulp out somewhere and let the water drain/soak/evaporate out of it until it hardens up. You can then pick it up and put it in the garbage, and no one will really be able to get any info out of the mess.

So I tried it. I immediately got it wrong. I started by filling two five gallon buckets with papers. Then I filled them with water.

Do you ever cook spaghetti only to have the noodles all clump together tightly and not want to separate? Paper is much, much worse. I should have separated them more, or better yet filled the bucket with water first, then put the documents in, page by page until it was maybe half full. The first time I went to stir them they all stuck together in a single mass that wouldn’t budge, let alone break up. Even my hand tiller tool, used for breaking up garden soil, wouldn’t work.

It became a battle of wills. I’d go outside once or twice every day, replace any evaporated or soaked-in water, and stir/till each bucket, slowly scraping bits and pieces of paper from the clumps. Over about a week it began to look more promising.

Finally I could wait no longer, and dumped out the two buckets on a tarp I set up and spread the pulp out to dry. That didn’t go quickly, either, as we have very few sunny places in our yard. It probably took another week of drying.

Eventually it dried enough to make an interesting piece of art. My wife joked about using them for floor mats, or table placemats, or finding a way to roll it out thinner and making our own recycled paper. Frankly, I don’t think there’s much worth doing with it other than throwing it away.

I really don’t see much to recommend this particular approach to document destruction. At this rate I’ll have my documents destroyed around about….October. It’s cheap, and it may even be less labor-intensive than sitting there for hours feeding a few pages at a time through a shredder. It’s certainly cheaper than a new shredder. What I really ought to do is get a good document scanner and a good shredder, scan the documents as soon as I get them and shred them on the spot. But I’m a cheapskate, so that probably won’t happen. But I also won’t pay to have the local UPS Store dispose of them for me, either, so who knows. Maybe the pulp-pots will remain in business?

I’ll probably try another batch with an entirely different approach and see how that goes, but at least by the time I’ve done that it should be easier to justify shelling out more for a good, industrial-strength shredder.

COVID Confusion

I found this in our local monthly/marketing newspaper in a humor piece of things the author learned from social media during the COVID-19 quarantine:

In effort not to get sick we should eat well, but we should not go out to get healthy fresh food when we run out and eat whatever pre-packaged food we have on hand instead. However, we should order out at our local restaurants to help keep them in business. Then it’s okay to go out to pick up the food. Your food might be prepared by someone sick that doesn’t know they are sick, but that’s okay if you pay by credit card and take the food out of the container. However, you should avoid going to the grocery store at all costs because you might get sick.

Joani Taylor, “The Social Media Scandal – What I Learned During Quarantine”, Sandy City Journal

If there is anyone left out there who still believes there’s a perfect response to a pandemic, especially one where the details about the virus aren’t really known…well, they’re probably on social media telling the rest of us what we should be doing. I’ve been fortunate enough to live in a state that took a somewhat moderate approach, while managing to keep the death rate fairly low, but the nags and scolds have been everywhere all the same.

Sure, I get it. People are scared, and fear makes people thrash about desperately in search of some way to feel in control. For many people that means lecturing everyone else. But the rest of us, when faced with conflicting information, reach a point where we just have to decide for ourselves which advice we can keep and what risks we are willing to take. Here are a few of the things I’ve learned (or re-learned) from all of this:

  • Preparation buys time. We were not as prepared as we wish we’d been, but we still had at least several weeks worth of all essential items. Even though we weren’t sure how long our toilet paper supply would last, we had enough to hang in there until more started appearing. We didn’t need to panic, spend exorbitant amounts of money to secure the essentials, and could put off even shopping for groceries until things calmed down.
  • People don’t want or can’t handle fresh. When we did go shopping we had no trouble finding fresh fruits and vegetables. Do people just not buy the more perishable items in an emergency? It’s not like we were without power. Veggies keep for weeks in the fridge. Or do people just not know how to prepare fruits and vegetables anymore? Not that I’m complaining. We’ve been able to eat healthy while everyone else, from the look of the store shelves, are existing on flour, pasta and beans.
  • Savings are essential. I am one of the fortunate people who can work from home, even if it’s not my preferred way to work. But even I had been furloughed or laid off we would have had savings to get through this.
  • Flexibility and resilience help. When things like this happen we can sit back and complain over every inconvenience or difficulty, or we can relax, take a deep breath (or two or three), and deal with everything one step at a time. This is easier to do if you’re not worried about basic survival.
  • Cut everyone some slack, including yourself. I’ve had to continually remind myself that people are experiencing widely varying levels of stress right now. On the other hand, if there were people whose stress was causing me stress, I’m not obligated to keep absorbing their stress. There are some where I hit the “social media snooze button” so I wouldn’t have to deal with them until things calm down again. For the most part people have been keeping things on an even keel, and when they aren’t I would try to be kind and remember where they’re coming from.
  • Even introverts need people. While introverts across the world have been cheering about this being the moment they were born for, the truth is, introversion does not mean we don’t need anyone else. Introversion/Extroversion is more a matter of where we get our energy from. Extroverts get their energy from being with others. Introverts get theirs from being somewhat isolated and quiet. We can enjoy social interactions, and even get some energy from particularly enjoyable ones, but most drain energy from us, and sooner or later we need to get away and recharge. Being shut up at home hasn’t been particularly difficult for me, but after a couple weeks I found myself reaching out to people much more than I usually do. I miss the depth, breadth and variety of my normal interactions.
  • Focus on what you can do. This crisis quickly revealed where our family is not as prepared as we should be. The problem is that some of that just can’t–and perhaps shouldn’t–be fixed right now. We found we were least prepared in our supplies of paper products, baking supplies, and a few other food categories. And yet if we’ve learned anything about shortages, it’s that running out and stocking up just make things worse for everyone, so we’ve had to resist that urge. Instead, we identified some things we can procure right now, and we’ve focused on that. We have a much better water storage now, and we’re better prepared for the next power outage (and in our area, there will be one). I feel satisfaction and accomplishment at having done something useful, even if I can’t solve all of the problem just yet.
  • Have a plan for the rest. As I said above, there are some preparedness deficiencies we can’t fix yet. But I’ve learned from sad experience that if I don’t have a plan in place for when we get back to normal-enough I’ll likely forget to do anything at all. I can take this time now to at least come up with a plan so that I know the next steps to take once we can take them.
  • It’s difficult to be prepared for everything. I’ve been a homeowner for over twenty years. In this part of the world we have to be on guard against mice. Right before our state went into quarantine we discovered something entirely new: rats. Mice we could have dealt with. Nothing we had worked on rats. And even after some online research and a curbside pickup purchase it took a long time to figure out what would work.

I could probably go on, but I’m hearing too many heads hitting keyboards already, so I’l spare you. This quarantine experience has certainly given us a lot to think about, and a lot of time in which to think about it. Right now the biggest question we should all ask is, “What do I do about it?” What are we going to change as a result of our experiences? Set a goal, make a plan, and get it done.

Unexpected surprises – Follow-up to a product review

Last week I wrote a review of the Saratoga Farms 5-gallon water containers we purchased recently. One of the things that bothered me about our purchase was that when I’d first started researching water containers there was an option to buy just the containers, and another to get a starter kit with them that included a wrench to tighten the caps. And oddly enough, they were the same price either way.

Unfortunately, when I went to order, the site claimed the “with kit” option was sold out. The price was so good on the containers I ordered them anyway, figuring I might pick up a smaller set with the kit another time–you can’t have too much water, right? But those were sold out, too. Then I checked back the following week after I received the initial order, and found that someone else was selling the containers with their own version of the kit. This one included a friction-band wrench, which looked like it could be pretty handy, so I ordered it.

That arrived this week, and when I filled these containers I got the chance to try out the friction-band wrench. Eh. It works, and it was certainly more effective than tightening the lids by hand, but the band slipped loose at high torque. But it appeared to do the job. The containers didn’t leak.

Today I took the dog outside to play just as the UPS driver was pulling away. She’d left a small package, which was odd. I didn’t remember having ordered anything. When I opened it I found a plastic lid wrench for the water containers, from the same company I’d ordered the original set from. We had…a mystery on our hands! Did they read my review and decide to help me out?

I keep everything (not always a good habit), so when I got back indoors I checked the packing slip from the previous shipment to confirm the order date. To my surprised, I found that the wrench was listed on the original packing slip, quantity 0. Evidently they considered my purchase part of some package deal, and the wrench had been back-ordered.

In any case, I now have two wrenches! So I guess I’ll review those, now.

My two wrenches

Actually, there’s not much to discuss. I prefer the one on the right. It’s made for these particular lids, and now that I’ve seen one in person I can tell it’s made of fairly high-grade plastic and won’t be breaking soon. The belt wrench works okay, but you have to re-adjust the belt after every turn, and the design of the containers only realistically about a 90-degree arc where the wrench will fit around the cap and you can turn it freely. It also puts your fingers right in line with the edge of the container when the belt slips. The plastic wrench handle is off-set so it rides above the container edges and can turn 360 degrees. It fits the cap more snugly.

Mind you, I’ll keep them both. And the belt wrench can be used for other size lids–which I have. It may come in handy in other ways.

Product Review: Saratoga Farms water containers

As discussed here and alluded to here, we finally decided to do something about our inadequate water storage. Fifteen gallons just won’t cut it for four people and three pets in any serious situation. I’d been looking into various options for some time, but finally decided to pull the trigger and get something.

I looked at large-capacity storage tanks (ie. 50 gallons + in a single big container). I looked at small-capacity storage. I discussed the merits of Water Bricks with my brother, who has been using them for a while for their storage. And over time I came to some conclusions. When we got water storage containers, they had to be:

  • 5 gallons or less so they can be carried easily to wherever they are to be used
  • made to take spigots to make dispensing easier
  • made of high density polyetholene (HDPE), and opaque for best storage and durability
  • airtight
  • inexpensive

I finally settled on Saratoga Farms’ 5 gallon stackable containers. I did consider Water Bricks, as their design allows for taller and more secure stacking, but I’d been warned by my brother that they can leak, and they’re designed to be stored sideways, which only encourages leakage. Perhaps I’ll invite him to do a guest review on his and how they’re performing. Ultimately the biggest deciding factor was price. For the amount of storage we purchased, we would have spent about a third more for the same volume in Water Bricks.

So we ordered them online, only to find they would be shipping from a local company not more than a few miles from our house. We prefer to shop local, but had already discarded that business, as their prices were too high by comparison. I wasn’t sure why they’re so willing to undercut themselves on Amazon, but that’s their business model, I suppose. Since then I’ve found another company selling the same containers on Amazon, also at a lower price, so I guess they needed to be competitive. But why they couldn’t lower their local price accordingly, I don’t know. They offer free shipping on Amazon, so had they sold at a similar price locally I would have saved us some time and them some money.

An empty container, pre-rinsing

The order arrived earlier than expected–always a plus. We had another order scheduled to arrive that day, so we thought it was the other order until a few hours later when the expected order arrived. That evening we unpacked the containers and put them in their expected destination until we had time to fill them.

That time was this weekend. My wife and one of my sons helped. I had heard that the containers seal better if washed first, and since they ship with no lids on it was probably safer to at least rinse them. Someone in the comments recommended filling a separate container with warm water and dish soap that you could then pour into the containers to swish around to clean them, as putting dish soap directly into the container itself would cause lots of foam and take a lot longer to rinse out. I may have put too much dish soap in the bucket I filled, but every container created a lot of foam when I started shaking it around. It did rinse out without much trouble, though.

The wash bucket

It might not have been the best idea, but for rinsing out the soap before filling I added some water, swished it around again, and then dumped it out on the lawn. My front lawn isn’t the greatest to begin with, though, so it it probably won’t make a difference.

To fill the buckets, I bought a fresh, clean hose just long enough to reach from the faucet to the containers. I intend to use this hose for nothing but filling water containers in order to keep it as clean as possible. Our house is on city water, which is chlorinated. Though the company that makes the containers suggests buying their water purifier solution, all the sites I checked (FEMA, ReadyUtah.org, etc.) all say that chlorinated city water is sufficient and should last at least six months to a year.

Containers during rinse and fill

Filling the containers didn’t take as long as I expected. We were able to fill one in a couple of minutes. From there we put on the cap. The caps that came with them have extra bands around the outside that ratchet against the opening on the container to keep the lid on tight. To open the containers you’ll have to tear the band off, similar to the caps on milk jugs.This implies the lids are not intended for reuse, though I can’t imagine there being any problem with it. The containers we already have been using are reusable and have given us no trouble.

Once each jug was capped I tested them to check for leaks. Here we ran into trouble. The very first container I tested dripped from the cap at a pretty steady rate. The second sealed just fine.

Signs of a leaking cap

As it turned out, close to half of them leaked. I had read in some of the reviews that the caps had to be really tight before they would seal, but other reviews insisted that you wouldn’t need the wrench they sold as part of a starter kit (which they were out of when I ordered them) and most people could hand-tighten the caps without any trouble. I’m only 135 lbs, and don’t lift, so I guess I don’t qualify for “most people.”

Stre-e-e-e-e-e-tch those pliers!

After several attempt to hand-tighten the caps (often I could go back after I’d already tightened the first time and tighten them a little more) I decided to see if by any chance my channel lock pliers would open wide enough to fit the caps. The fit–just barely–and I found I was able to tighten each lid at least another five or six clicks beyond what I could do by hand. That seemed to be tight enough, finally, and I didn’t have any more containers that leaked.

Finally I was able to place the containers in the location I had prepared. I’ve heard from several sources that plastic containers react with concrete floors, leeching chemicals into the water. I’ve also found sources contesting that assertion. In my case I chose not to take chances, plus it’ll keep the containers cleaner if they’re not right on the floor. I laid down some two-by-fours and a section of old wall board on top of that to provide a slight base just wide enough to stack two containers next to one another. The containers are 10″ x 11″, and 14″ tall, and designed to bear the weight of additional containers on top.

Yup, they stack! My old ones (seen on the left)…don’t.

When stacked like this they really to store efficiently. I’m not sure I’d trust the caps enough to store them on their sides, at least not in an area that doesn’t take water leakage well, but upright like this they should be just fine. It’s recommended you store them in a cool, dark place. I’m not sure that’s as critical with the right containers. Sunlight encourages algae growth, and cooler temperatures tend to preserve most things better, but we’ve stored water in the containers on the left in our garage before, and the water was fine for several years at least.

The key is when you go to use the water, check for two things. First, is there anything floating on top the water when you open the cap. That’s bad; the water grew bacteria. Second, smell the water. If it stinks, don’t use it. If it just smells stale it’s fine. The air in water tends to separate out over time, so when you go to use it you might want to add air back in by pouring it into a sealable container and shaking it up, stirring it well, or some other means of aerating it.

The long-term viability of these containers is yet to be seen, of course, but so far I’m satisfied with the investment. The difficulty in getting them to seal was frustrating, but otherwise they function pretty much as advertised. They are a little heavy to lug around, but the handles are comfortable, so getting them from their storage location to our kitchen to use shouldn’t be an issue. Even I’M not that wimpy!

I will test the water quality in about six months, and then a year, and see how it goes. If there’s a problem I’ll write a follow-up review and/or update this post. But I will admit that I feel better knowing we have a good amount of water on hand should we have any more quality issues with the city system or should we get hit with a worse earthquake (though that in itself might reveal some other issues, such as whether the containers are durable enough to handle falling over without rupturing or compromising the seal).

All in all, these containers seem to be a good storage solution at a decent price. Most containers seem to sell for at least $20 – 25 for a 5-gallon unit. With some bulk pricing these came to close to $17.75 or so. It’s a little pricey for something so simple, and there may be cheaper solutions (like the larger barrels or tanks), but over-all I don’t think it’s too much to spend for peace of mind.

UPDATE – May 8, 2020 – I got some more containers from another source that included a wrench. I also got a back-ordered wrench from the first source that I didn’t realize was coming. It’s time for the Battle of the Wrenches!

Preparedness gap: Water

“But when it comes to slaughter   
You will do your work on water,
An’ you’ll lick the bloomin’ boots of ’im that’s got it.”

– Rudyard Kipling, “Gunga Din”

A little over a year ago we got a text from our son at the high school basketball game: the local news was reporting that our water supply was contaminated and the city was instructing residents not to drink any of it until further notice. It turned out at one of the pumping stations the machinery that added fluoride to our water had malfunctioned and dumped a whole bunch of it into our water system. That, in turn, may have stripped the inner layer of the pipes, putting potentially dangerous levels of metals in the water. All residents in the affected area (which included us) were not to drink the water under any circumstances until further notice.

As it turned out they had the problem corrected within a couple days, but in the mean time we became aware of just how much water we use–and just how little we had stored. We had three 5-gallon containers to go around for five people and four pets. Had it gone on a couple days more we would have been in trouble.

We vowed then to get more serious about water storage–but we never got around to it. Fast forward a year, and the COVID-19 outbreak came along and revealed more deficiencies in our emergency preparations. Remembering our experience the year before, water storage got moved to the top of the list. We decided to use our government stimulus check to start improving our circumstances.

After some research and some calculations we ordered enough containers to put us in a much better position should water ever become temporarily scarce again. They should be arriving in a couple weeks. By then I hope to have a few things reorganized around the house so that we’ll have places to put all that water.

When we get everything settled I’ll post a review. My brother and I were discussing water storage a week or two ago, and he’s going a different route with his. Perhaps I’ll solicit him for feedback as well.

It’ll be a relief to have that particular deficiency resolved. Water is not something you want to be without. I don’t want to be lickin’ anyone’s bloomin’ boots, thank you.

Emergency preparation for apartments

American Prepper Network had a good article up today about emergency preparations you can make even if your living space is limited (or controlled, ie. strict rules).

I think the main point of this article is that even this limited amount of preparation can help in a tight spot. There was nothing on their list that was unique to apartment life–it was good advice for anyone.

Having lived in several apartments during my life I’m amazed by just how much room you can exploit if you really try. The key is that you have to:

  1. Be creative. There is space everywhere, if you know how to use it. Even right out in the open can be a good place with a little creative screening or decorative boxing.
  2. Make storage a priority. Any amount of space will fill up. The key is making sure you fill it up with the right stuff. Instead of keeping a supply of dead electronics (I’m guilty!), use that space for rice, beans, or other staples.
  3. Check regularly for unwanted guests. Mice and other pests can get into all sorts of places. Make sure you check regularly for signs (scattered traces of food, droppings, shredded insulation, wall-materials, paper).
  4. Keep an inventory of what you have and where it is. You may be so creative with your storage that you may forget you have certain things, or where you put stuff.
  5. Make yourself rotate your stored items regularly. If you can, use from your storage first and replace it with new items.
  6. Keep track of what you use so you can replace it.

While having more space certainly helps, it often comes down more to what you do with the space you have than how much you have. Apartment-dwellers can be just as prepared as anyone else–and in some cases their emergency stores may even be better protected.