I live in a part of the world where self-reliance is almost literally a religion, though few actually follow through on the counsel given. But one couple, who live about 40 minutes from me, have been preaching self-reliance and emergency preparation themselves for a while. Then last year they decided to test their actual preparedness by not going to the store for 90 days.
Needless to say, when COVID-19 hit this year, they were ready:
“In a day, things went from normal life to, ‘Oh my goodness,’” said Kylene, remembering when everything came to a screeching halt in mid-March. “For us it was very surreal, because of what we’d already been through. We had a plan and we knew what to do.”
Read the entire article here, and check out their website here.
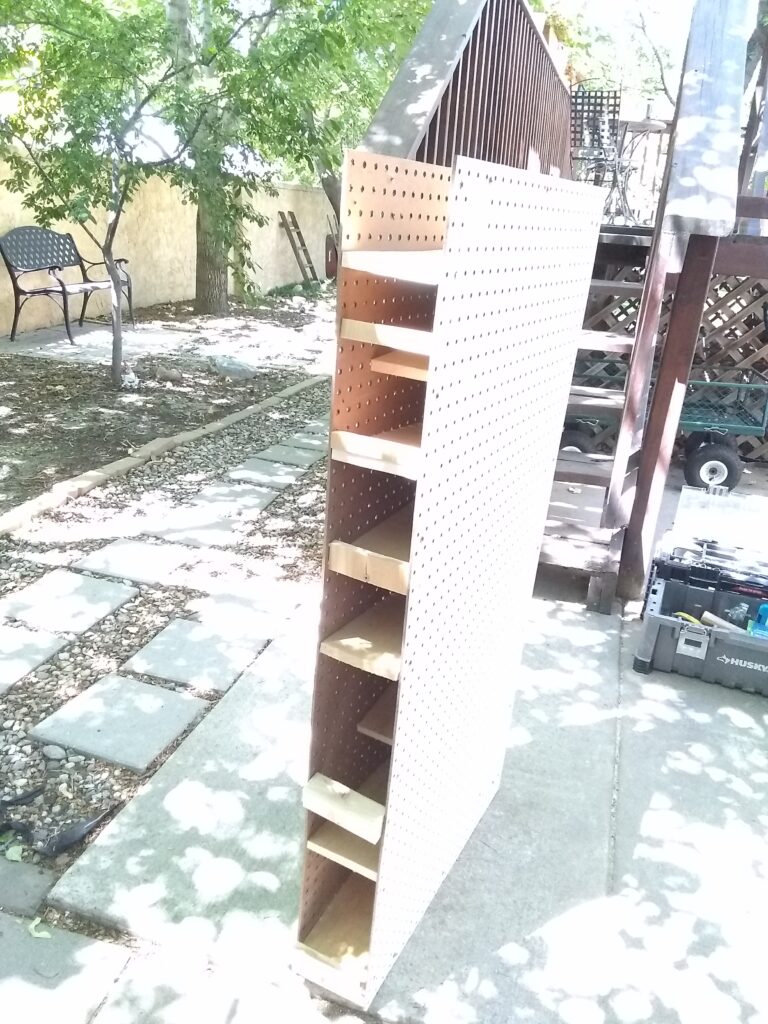
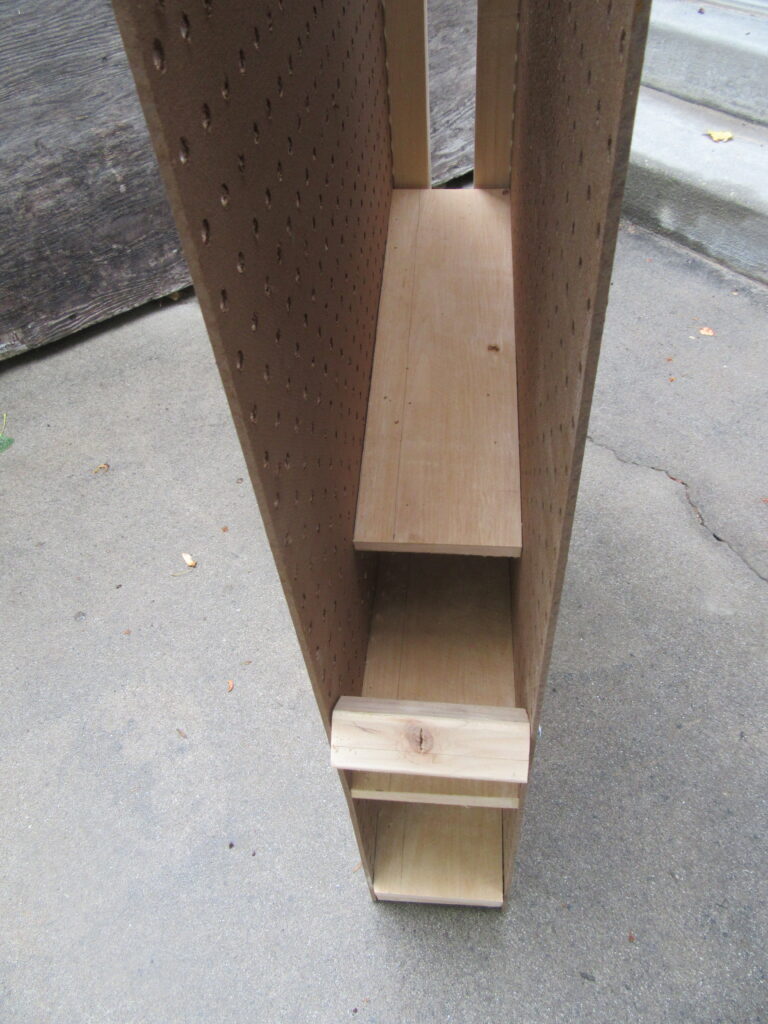
I was able to get out and work on my canned goods storage/rotation system this weekend and finished my prototype unit. Here’s how it turned out:
The pictures aren’t the best; my apologies. As you can see, though, it’s still rough, still…a prototype.
What I ended up with holds two types of cans, 28 oz. cans in the lower half, 14.5 oz. cans in the upper half. I did this because it was clear after the first half that I wouldn’t be able to fit four more levels of the 28 oz. cans in my unit, so I decided to try how many levels of the smaller cans would fit.
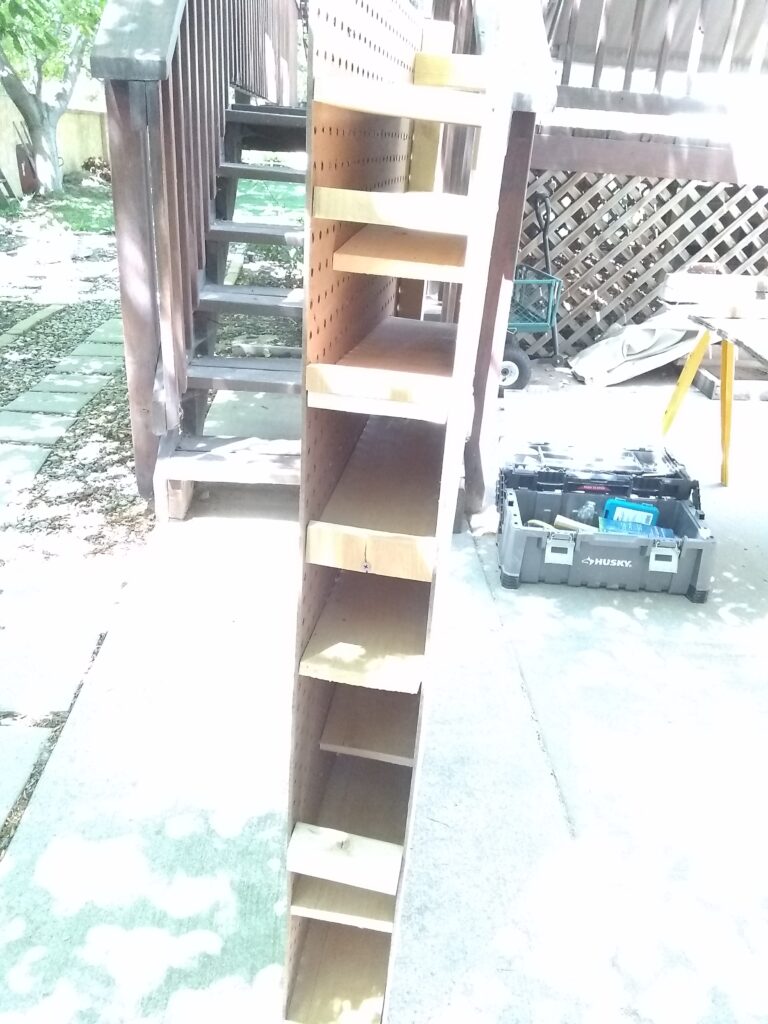
I realized pretty quickly that I would not be able to fit four levels of smaller cans in the remaining space. At that point I was slanting the shelves at a 2-inch slant front-to-back, so I tried reducing that to a 1-inch slant. I also lowered a few of the bigger can shelves to that slant as well. As it was, I still couldn’t make it all fit. There wasn’t room to put the cans in at the top, as there was still the 2×2″ support beams across the top, even when I tried laying the very top shelf flat instead of the usual slant.
Next I tried taking the 2×2’s out, figuring at that point I had enough shelves screwed in across the sides to stabilize the unit. That worked. I suppose at that point I could/should have added a slant to the top shelf, but I didn’t. I was more concerned about how well the unit would hold up.
My next step was to take the unit down into our basement and see how many cans I could fit in it, if the gravity feed would work correctly, and if it would hold up. Sorry I didn’t get pictures of that. But I can tell you that the bottom half holds 20 of the larger cans. It does have some difficulties feeding, which I will need to work out. It’s not a big deal, but it does involve reaching into the unit to clear the blockages.
As far as the smaller cans, the upper section held twelve of those just in the first two shelves, with room for at least one more. I didn’t add more, as I didn’t want to add a different vegetable at that point. Not having a slant on the top shelf is an annoyance, as you have to manually push the cans to the back before they begin to feed. I’ll definitely have to fix that, as my current plan for the storage room will put that shelf up near the ceiling, making it hard to push.
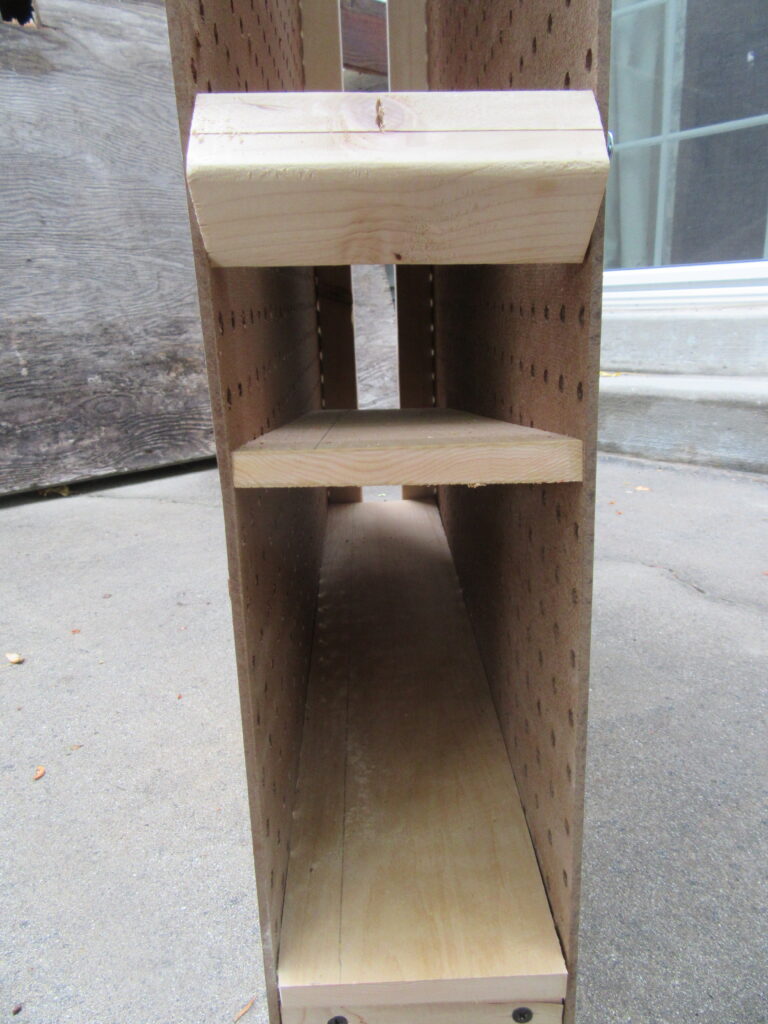
All in all, the unit was sturdy enough to hold the weight. If anything, loading it with cans made it more sturdy. The feeding is the primary issue. The transition from an upper shelf to a lower shelf is one issue that can likely be addressed in the next iteration.
The other problem is that the cans rub against the sides and the friction slows them down or stops them altogether. For that I blame the materials I’m using, at least for now.
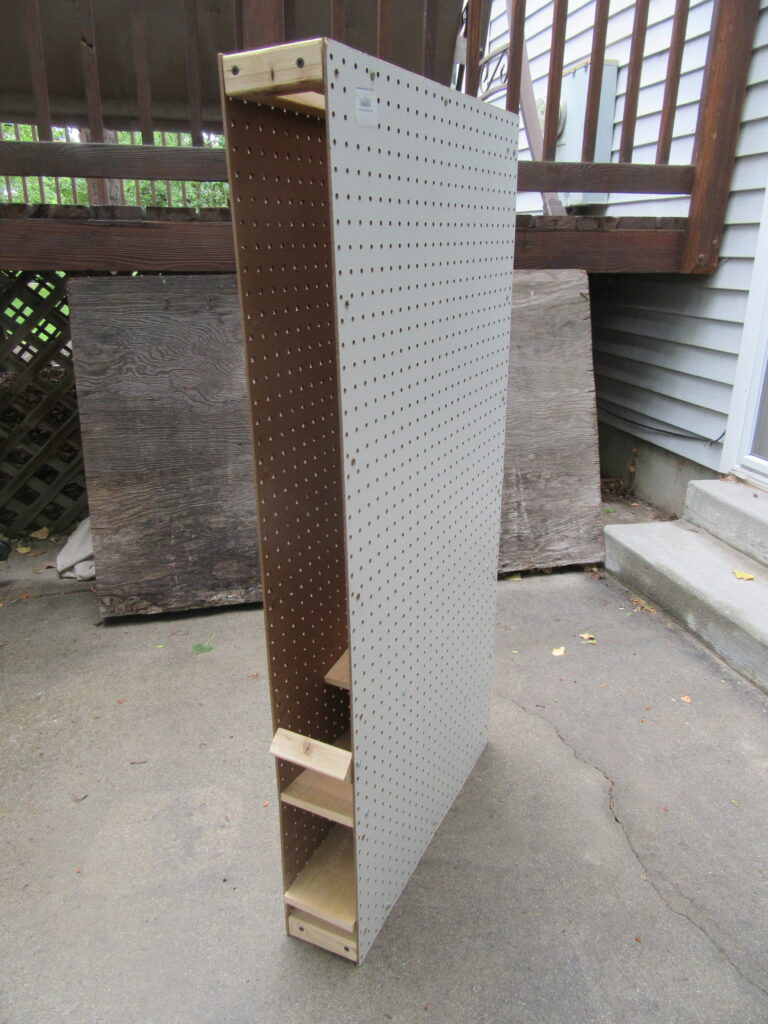
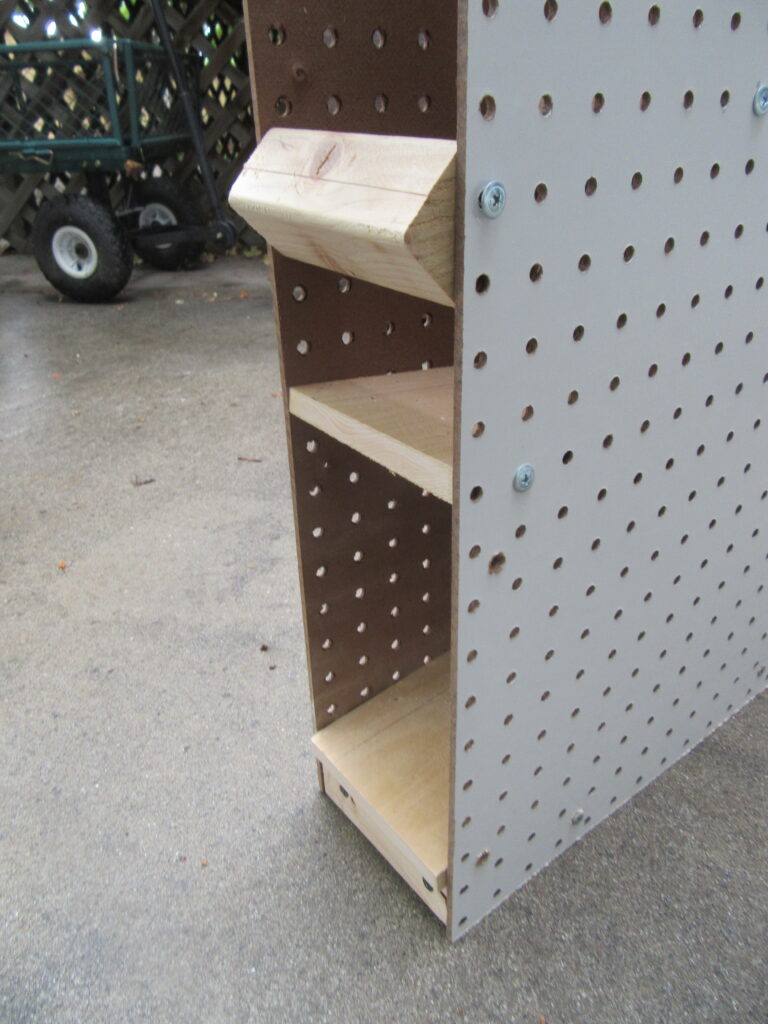
Pegboard has two sides, a white, smooth side and a brown rough side. I went for appearances and put the smooth side out. In reality, when these are lined up next to other units you won’t even see the outside surface. On the next test I’ll put the smooth side inside, which should reduce the friction against the cans. When the slant on the shelves was 2″ the friction wasn’t nearly as big an issue, but reducing that to 1″ lessens the pull of gravity. I don’t think I can get by making the slant steeper, so I’ll have to find other ways to help overcome friction from the sides.
A third issue, related to the second, was that occasionally the shelves were too narrow, and when screwed into the sides they pulled the sides in too much, narrowing the passage enough to catch the cans. I hope to have better tools by the time I try the next prototype and be able to get more uniform cuts to my wood.
I’m still impressed with the versatility of the pegboard. The ability to see through the walls, so to speak, is invaluable, as is the ability to move shelves around without having to drill new holes in the walls. I’m hoping to find a way to position the screw holes in the sides of the shelves more uniformly in the future as well so the shelves will be more level side-to-side.
I also plan to experiment with having less support structure. If I cut the shelves uniformly they should provide lots of stability to keep the tower from leaning. I may be able to get by using 1×2″s along the back instead of 2×2″s without losing any stability, and at this point I’m not sure I even need any support along the bottom and top edges, which may open up more vertical space for shelving. I’m really hoping I can make this work with good efficiency using standard sizes (ie. 2’x4′ pegboard panels) to minimize waste. If I have to make each unit 4.5 to 5 feet tall, for example, I’ll have to cut 4’x8′ sheets to size, which will waste the last three feet of pegboard.
The biggest success I’m seeing so far is the potential efficiency in storage and rotation. While a series of shelf a la Donkey Kong isn’t entirely efficient, it’s more efficient than standard shelves. Being able to line these units up side by side will increase our storage capacity considerably, and make rotation much less work. I’m excited to move on to Phase Two of this project in finalizing the design I’ll then start “mass producing,” as well as getting a final idea of cost. It appears so far that I’m spending about $30-35 per unit, but I’m hoping to pin that down tighter.
Storing canned goods is pretty much a given in any long-term food storage program. Storing them so you can rotate them easily, however, is something of a trick. I’ve heard of and seen of can storage racks where you feed them in at the top and they roll down a series of ramps to the bottom so you they’re automatically sorted for rotation. I’ve been thinking for years of how to make some for our storage room, but the thought of trying to figure out all the measurements and angles, rout out perfect grooves, and make sure they actually feed through the system properly has left my head hurting.
Ever since I re-started this blog and got serious about self-reliance again I’ve been devoting a fair amount of mental bandwidth to the problem again. Those gravity-feed can stackers are nice, but they don’t use space as efficiently as they might. But then, neither do most storage shelves. There’s always empty, unused space. And anything I build is going to be a bit pricey. Is there a cheaper way? Is there a way to experiment?
Well, I finally solved the last question. It dawned on me this week that pegboard is amazingly reusable, and sturdy enough to prototyping at the very least. I picked up some materials this weekend and got to work designing a test rack.
After getting the dimensions of several different types of cans I set to work building the frame for a single rack from two 2’x4′ pegboards and some 2″x2″ studs. It didn’t take long before I made my first mistakes. Fortunately they were easily remedied and I was able to move on to the next phase.
Cedar fence boards are my go-to disposable wood. When my wife and I became Cub Scout leaders I was able to design a bird house using 6″ fence boards, and I was able to get two bird houses out of a single $2.00 board (prices have gone up since then). For this project, where I needed shelves exactly 4.75″ wide, which is too wide for most boards, and far too thin for others. But a 6″ cedar board can cut down to size with little waste, and are thick enough to put screws into the side of it.
So after trimming some fence board down to the right width, I started experimenting with properly sizing and positioning the shelves within the frame, starting from the bottom. That shelf would need to slope toward the front. The next shelf above that would need to slope toward the back of the unit, with enough a gap at the back to allow cans to fall down onto the back of the lowest self. Getting the slope right is the main issue. Too shallow and cans don’t roll. Too steep and you take up more space than needed (and could potentially propel cans right out the front of the unit).
Here’s where what I like to think of as the genius of my idea came into play. Using pegboard for the sides I didn’t have to drill a bunch of holes, and could easily see where the shelves were within the frame. I could then use the existing peg holes, and put a screw through the hole into the shelf to hold it in place. If, upon testing, the angle was wrong, I could remove the screw, raise the shelf to a better angle, and put the screw into the board through a different peg hole at the right spot. It’s about as flexible a system as I could contrive with standard materials.
I didn’t quite get as far as I wanted this weekend. My test model only has three shelves, so I have to feed from the back of the top shelf until I get the fourth in place. With a little luck I should be able to get two sets of four shelves in a single unit, but that’s still a ways off. I’m not completely thrilled with how the first run is turning out, and I’m finding some issues with my choice of materials (cedar boards warp REALLY easily) that may account for why the cans don’t roll consistently from top to bottom without getting stuck. The consolation there is that my open design makes it easy to reach in and push the cans when needed.
As I continue to work with my test frame I’ll keep you posted. If I’m pleased enough with the outcome to where I think I’m ready to “mass produce” these I’ll perhaps post some blueprints, or at least more detailed photos.
EDIT: Sneaked out and got a few pics of the test frame:
“But when it comes to slaughter You will do your work on water, An’ you’ll lick the bloomin’ boots of ’im that’s got it.” – Rudyard Kipling, “Gunga Din”
A little over a year ago we got a text from our son at the high school basketball game: the local news was reporting that our water supply was contaminated and the city was instructing residents not to drink any of it until further notice. It turned out at one of the pumping stations the machinery that added fluoride to our water had malfunctioned and dumped a whole bunch of it into our water system. That, in turn, may have stripped the inner layer of the pipes, putting potentially dangerous levels of metals in the water. All residents in the affected area (which included us) were not to drink the water under any circumstances until further notice.
As it turned out they had the problem corrected within a couple days, but in the mean time we became aware of just how much water we use–and just how little we had stored. We had three 5-gallon containers to go around for five people and four pets. Had it gone on a couple days more we would have been in trouble.
We vowed then to get more serious about water storage–but we never got around to it. Fast forward a year, and the COVID-19 outbreak came along and revealed more deficiencies in our emergency preparations. Remembering our experience the year before, water storage got moved to the top of the list. We decided to use our government stimulus check to start improving our circumstances.
After some research and some calculations we ordered enough containers to put us in a much better position should water ever become temporarily scarce again. They should be arriving in a couple weeks. By then I hope to have a few things reorganized around the house so that we’ll have places to put all that water.
When we get everything settled I’ll post a review. My brother and I were discussing water storage a week or two ago, and he’s going a different route with his. Perhaps I’ll solicit him for feedback as well.
It’ll be a relief to have that particular deficiency resolved. Water is not something you want to be without. I don’t want to be lickin’ anyone’s bloomin’ boots, thank you.
There is one good thing about uprooting your family and moving to another state: You get to choose a new home. Having lived in two previous homes, we’ve learned a few things about what is important to us. One important factor is home food production. Even if it’s a small garden to supplement our grocery purchases, it’s important to us.
So when I went house shopping in our new town (I say “I” because my wife was 400 miles away and only able to offer guidance based on the MLS listings or from photos I sent) one of the main considerations was either the presence of food production space or the potential for it. In some ways, the having the room to put in gardens or trees was preferable, as we didn’t want to inherit any bad placement or planning.
As it was, though, the house we chose has both–established fruit trees and dedicated vegetable garden space and room for more if we choose. The house itself was nice, but one look at the yard and that clinched it. This house had “us” written all over it.
I’m sure we’ll find some of the former owners’ choices don’t work well for us, and some changes will need to be made, but few things indicate “this will work” as well as fruit hanging on the trees and a garden rapidly approaching the point of harvest. We know you can grow food here because we see it being done. We are literally enjoying the fruit of someone else’s labors.
So whatever difficulties our new situation may introduce into our plan to return to self-reliance, at least our yard is not one of them. In that regard, knowing what we wanted up front has paid off already.
When starting a new job simultaneous with moving into a new home in a new state there is a certain amount of chaos wrecked on the home finances. There are unexpected expenses in moving out, unexpected expenses in moving in, and extra start-up costs for all the new services, not to mention replacing all those things you threw out before you moved thinking you wouldn’t need them in your new place.
And there’s always the unexpected house repairs for things that the inspector missed.
It suffices to say that for the first month or two you’ll be doing well just keeping track of whether or not you have money, let alone how much and where it needs to go. Chances are your paycheck will fluctuate for awhile, too, as taxes, shared costs on benefits, and other items kick in.
The sooner you can make sense of the chaos the better, of course. Any and all information you can collect will be helpful. Start up a list of all the recurring bills that have come, along with any you are still waiting to come. At the very least you’ll be able to establish what you don’t yet know.
Then as your bills start arriving, start recording the amounts, noting what expenses are one-time start-up costs and what are more likely to be the ongoing amount. Start using this to put together a baseline of what you think your monthly living expenses will be. Then over the next few months start validating your list, adjusting as needed as you get more data. If you’re lucky you’ll have a fairly solid baselin within a month, but expect it to take at least three months for things to really even out.
Obviously if you see problems popping up (ie. more expenses than income) you need to start making adjustments. You may wish to over time anyway, even if your cash flow is positive. For example, our original plan in moving in was to get cell phones and skip getting a land-line this time. But further research quickly showed that IP phones, cable DSL, and other potential money-savers weren’t such bargains after all. And our cell reception at our home is a bit spotty. So now we have a land-line and cell phones.
Even when we just had the cell phones we didn’t use nearly as many minutes as I had expected. Chances are we’re going to pare back our service. It’ll only save us $10-20 a month, but every bit helps. $20 a month toward food storage goes a long way, for example.
Right now we’re not through our first month, so our baseline is still fairly unstable. But I’ll be tightening it up as quickly as I can. It’s driving me nuts to not yet have a reliable budget. I must have ORDER!!!!
We have closed on our new house, moved in, and have been there a week and a half. It’s been an adventure. Our air conditioner blew a fuse our first weekend here. We have numerous electrical outlets that don’t work. Our phone lines worked for a few days, then croaked. The connection to the house is fine, so the phone company won’t help. I’m currently pirating my own phone service by running a cable from the outside box to my DSL modem, which in turn connects in one phone.
And we have an ant problem.
Some of the “loveableness” of the house has rubbed off, but I still like the place. It will be a great home once we get things settled in, some things repaired, and some things banished back to the depths of hades from whence they sprang. We still have ample room for storage, and that will be a very good thing once we get into a position to capitalize on it.
This weekend we entered contract to buy a house. It’s been a bit of a challenge, and it wasn’t looking good there for awhile. But we did it, and now we’re in the application and documentation stage.
The first problem came when I went out with the realtor to finalize which house we were going to pick. There were three to choose from; two we’d already seen and liked, and a third that we’d noticed and wanted to look at. At the first two we noticed problems we’d not noticed before, like signs of water damage, broken windows, evidence that the air conditioner was broken, etc. The third house, however, was looking pretty good.
And then suddenly it wasn’t. We realized that while it might be relatively close to my work, it was not going to be close to anything else that mattered to us. The layout started to feel wrong. Soon about the only things I felt good about were the neighborhood and the yard. We changed course and tried looking in some different parts of town that we’d not really considered all that much previously.
Oddly enough we found the best house yet on the first try. It’s got everything we find important: lots of bedrooms, good layout, plenty of storage, lots of mature trees, a big yard, a designated garden (well-cared-for and growing vegetables, no less), fruit trees, and room to practice baseball with the kids. It’s two blocks from the kids’ elementary, four blocks to the junior high they’ll attend, and four blocks to the high school. And while perhaps not as close to work as some of the others we were looking at, I’ll have several more options for my commute that may prove handy.
So we put in an offer, with several other parties supposedly hot on our heels. No other offers materialized, however, and while the sellers counter-offered, it was still acceptable. And we’ve found a lender who thinks he can get this closed in less than a month. So we’re ready to roll, full speed ahead.
With my new job comes relocation. I’m not looking forward to it, and other than my new job itself, it demands the bulk of my attention every day. There are a lot of decisions to be made, and a lot of information needed to make those decisions.
There are four main issues here. First is that we have our current house. The housing market has not been good in our city, and even though we put 20% down when we bought it six years ago, we now owe more on it than we can likely sell it for. We have two options: Short sale, or rent it out until the market comes back.
Second is finding a place to live in our new city. The family is still in our old city, which makes it a bit difficult to look at houses together. Here the decision has been largely between renting a place for awhile or trying to somehow buy a house.
Third is the fact that we don’t have a lot of money left. We’ve been living on our savings for over two years, and we were just about hitting the bottom when I got this job. We don’t have much money for a down payment, and houses here are not cheap. Their “low” prices now are at the “high” range we hit in our old city before the real estate bubble burst.
Fourth is the fact that we are rapidly coming up on the start of another school year. We would very much like to get our kids into school on time down here.
In spite of the hurry we’re in, we’ve had to take it a bit slowly, trying to find out what we don’t know and then find the information. We’re putting together the pieces, and I hope to get the last pieces in place this week. We’re finding we have options, but we may not be able adequately satisfy all our concerns. The kids may have to start school a little late, perhaps. It may cost us more money to get what we want now than if we were to wait and build up our resources.
But other than the job, the place we choose to live is also very essential to achieving self reliance again. We want to place ourselves in the best situation we can for regaining a measure of security. This next week will be very important.