A few months ago I bought a table saw and a dado stack set to help with some major projects I have coming up this year. I reviewed the DeWalt table saw yesterday. Today it’s the dado set’s turn.
I’m not a sophisticated woodworker. No high-quality, rare hardwood, micro-tolerance projects for me. So admittedly, I did not go after a precision dado set but rather something passable that would work with the more rough work I do. I picked up the Freud 8″ Stacked Dado Set for All Saws (SD208S).
The set comes with two outer blades, three chipper blades, a pair of spacers, and a bunch of shims in two sizes, all for about $100. It came in a fairly durable plastic carry case with a compartment on either side. the blades and spacers all go on two central spindles with screw-in caps to hold them in place in the case. It also includes a cardboard instruction card that doubles as the packaging front cover. Inside it tells you the necessary configurations to create stacks of all sizes from the minimum to the maximum.
The instructions are fairly good, so it wasn’t difficult for me to put together a test stack of half an inch to try out. Once I was more comfortable with dados I switched to a 3/4 inch stack in order to mass-produce some 1/5″ dados. The rips went well, with only a little splintering and tearing. The sides and bottoms of each dado were smooth. I have no micrometer, so I can’t verify the sizing was accurate to any particular degree of tolerance, but I tried the intended board size in the groove and it fit well. Considering I was making two cuts to achieve the 3/4 inches, and had sized the stack just a touch wider than 3/4 to allow for overlap, any discrepancy is more likely to be poor measurement on my part. In any case it’s good enough for what I’m doing. I suspect, as thin as the shims get, if precision is essential you can probably adjust accordingly.
I found putting a stack together to be fairly simple. The shims, being flimsy, tend to flex and lock to the arbor, making them a little harder to remove, but I suspect that’s normal and goes with the territory. Considering how much easier this is to use than my router (I don’t have a router table), I’m not going to complain.
All in all, I’m pleased with it. I just hope I never lose the instructions. I understand Freud is a fairly good brand. This particular set is rated a 4.7/5 with 430 reviews on Amazon. Should I need another dado set in the future I’ll likely look at Freud first.
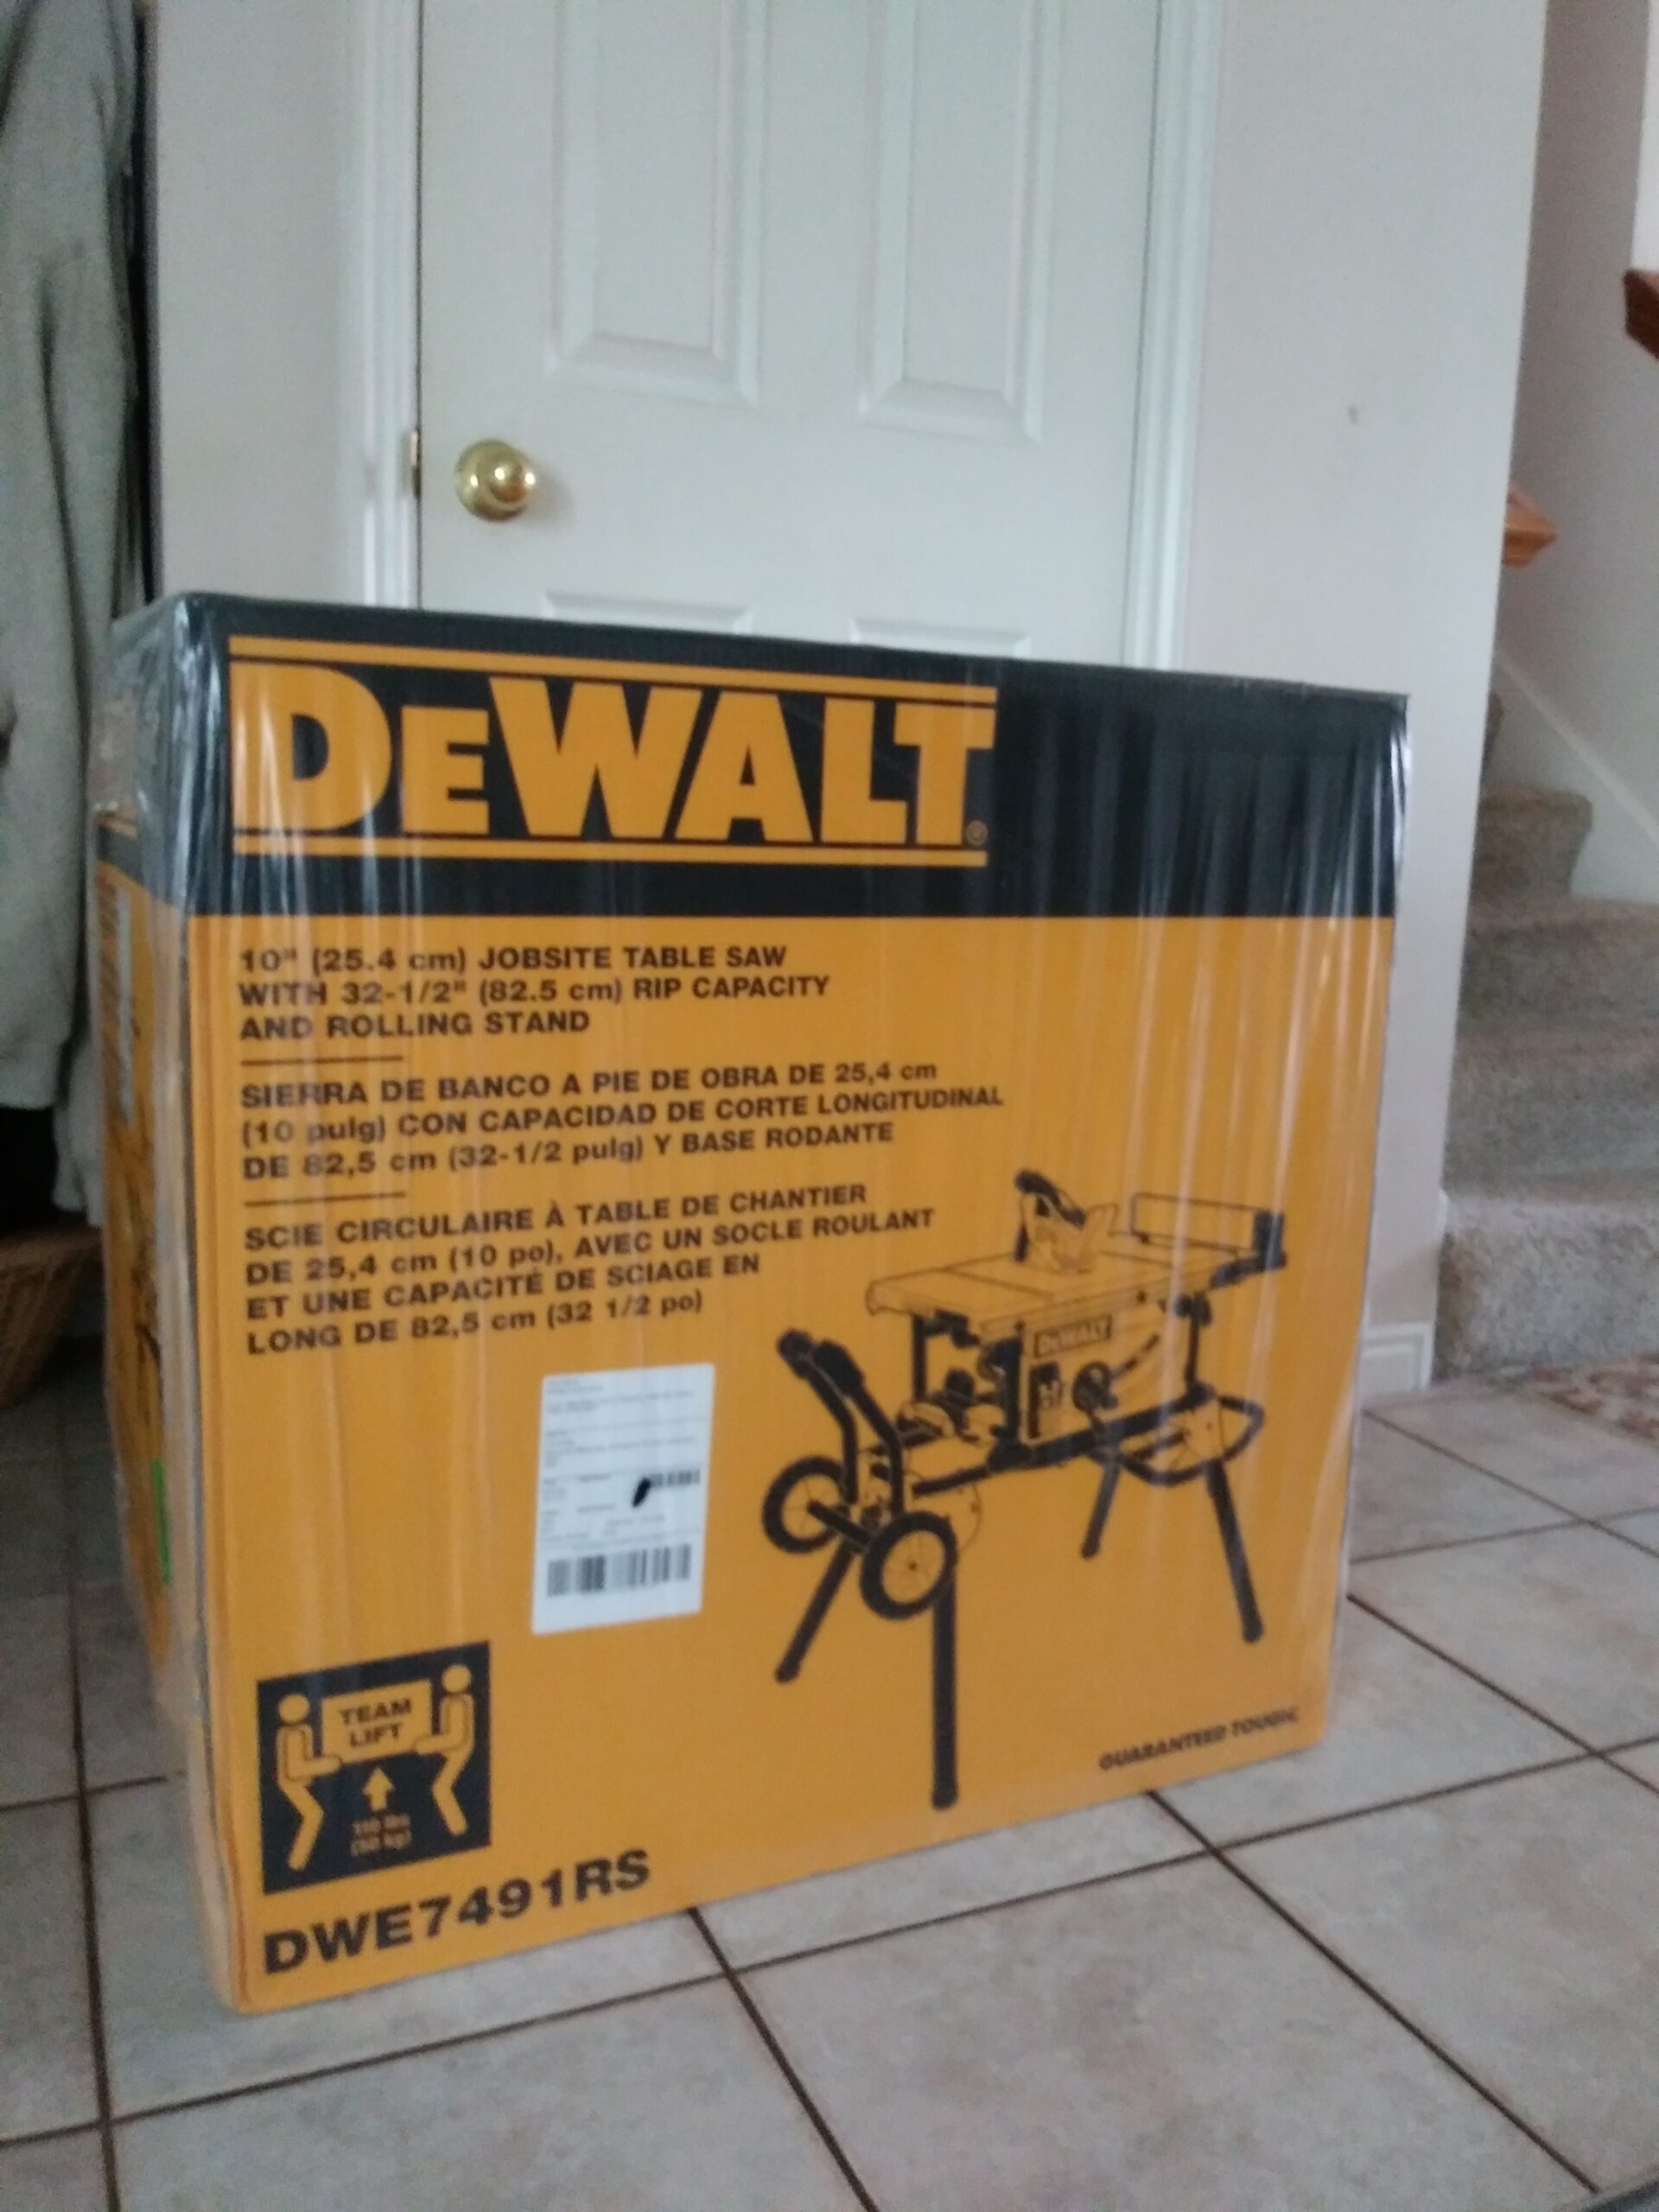
I recently wrote about the factors that I considered in shopping for a table saw. Today I’m going to tell you about what I bought and review my experience. Behold, the DeWalt DWE7491RS 10-inch Table Saw:
All assembled and ready to rip! Makes sawdust like no tomorrow!
I actually bought this baby back in January, but other than assembling it, I’ve been unable to try it out until this week. My project list demanded immediate attention, and mostly that involved slinging a paintbrush, followed by a posthole digger. Maybe a story for another blog post later on.
I suppose if I were cool and hip I’d have created an Unboxing Video for you all. But…no. But here’s the box it came in:
Big box! I could sleep in it! Took two deliverymen to lug the thing inside.
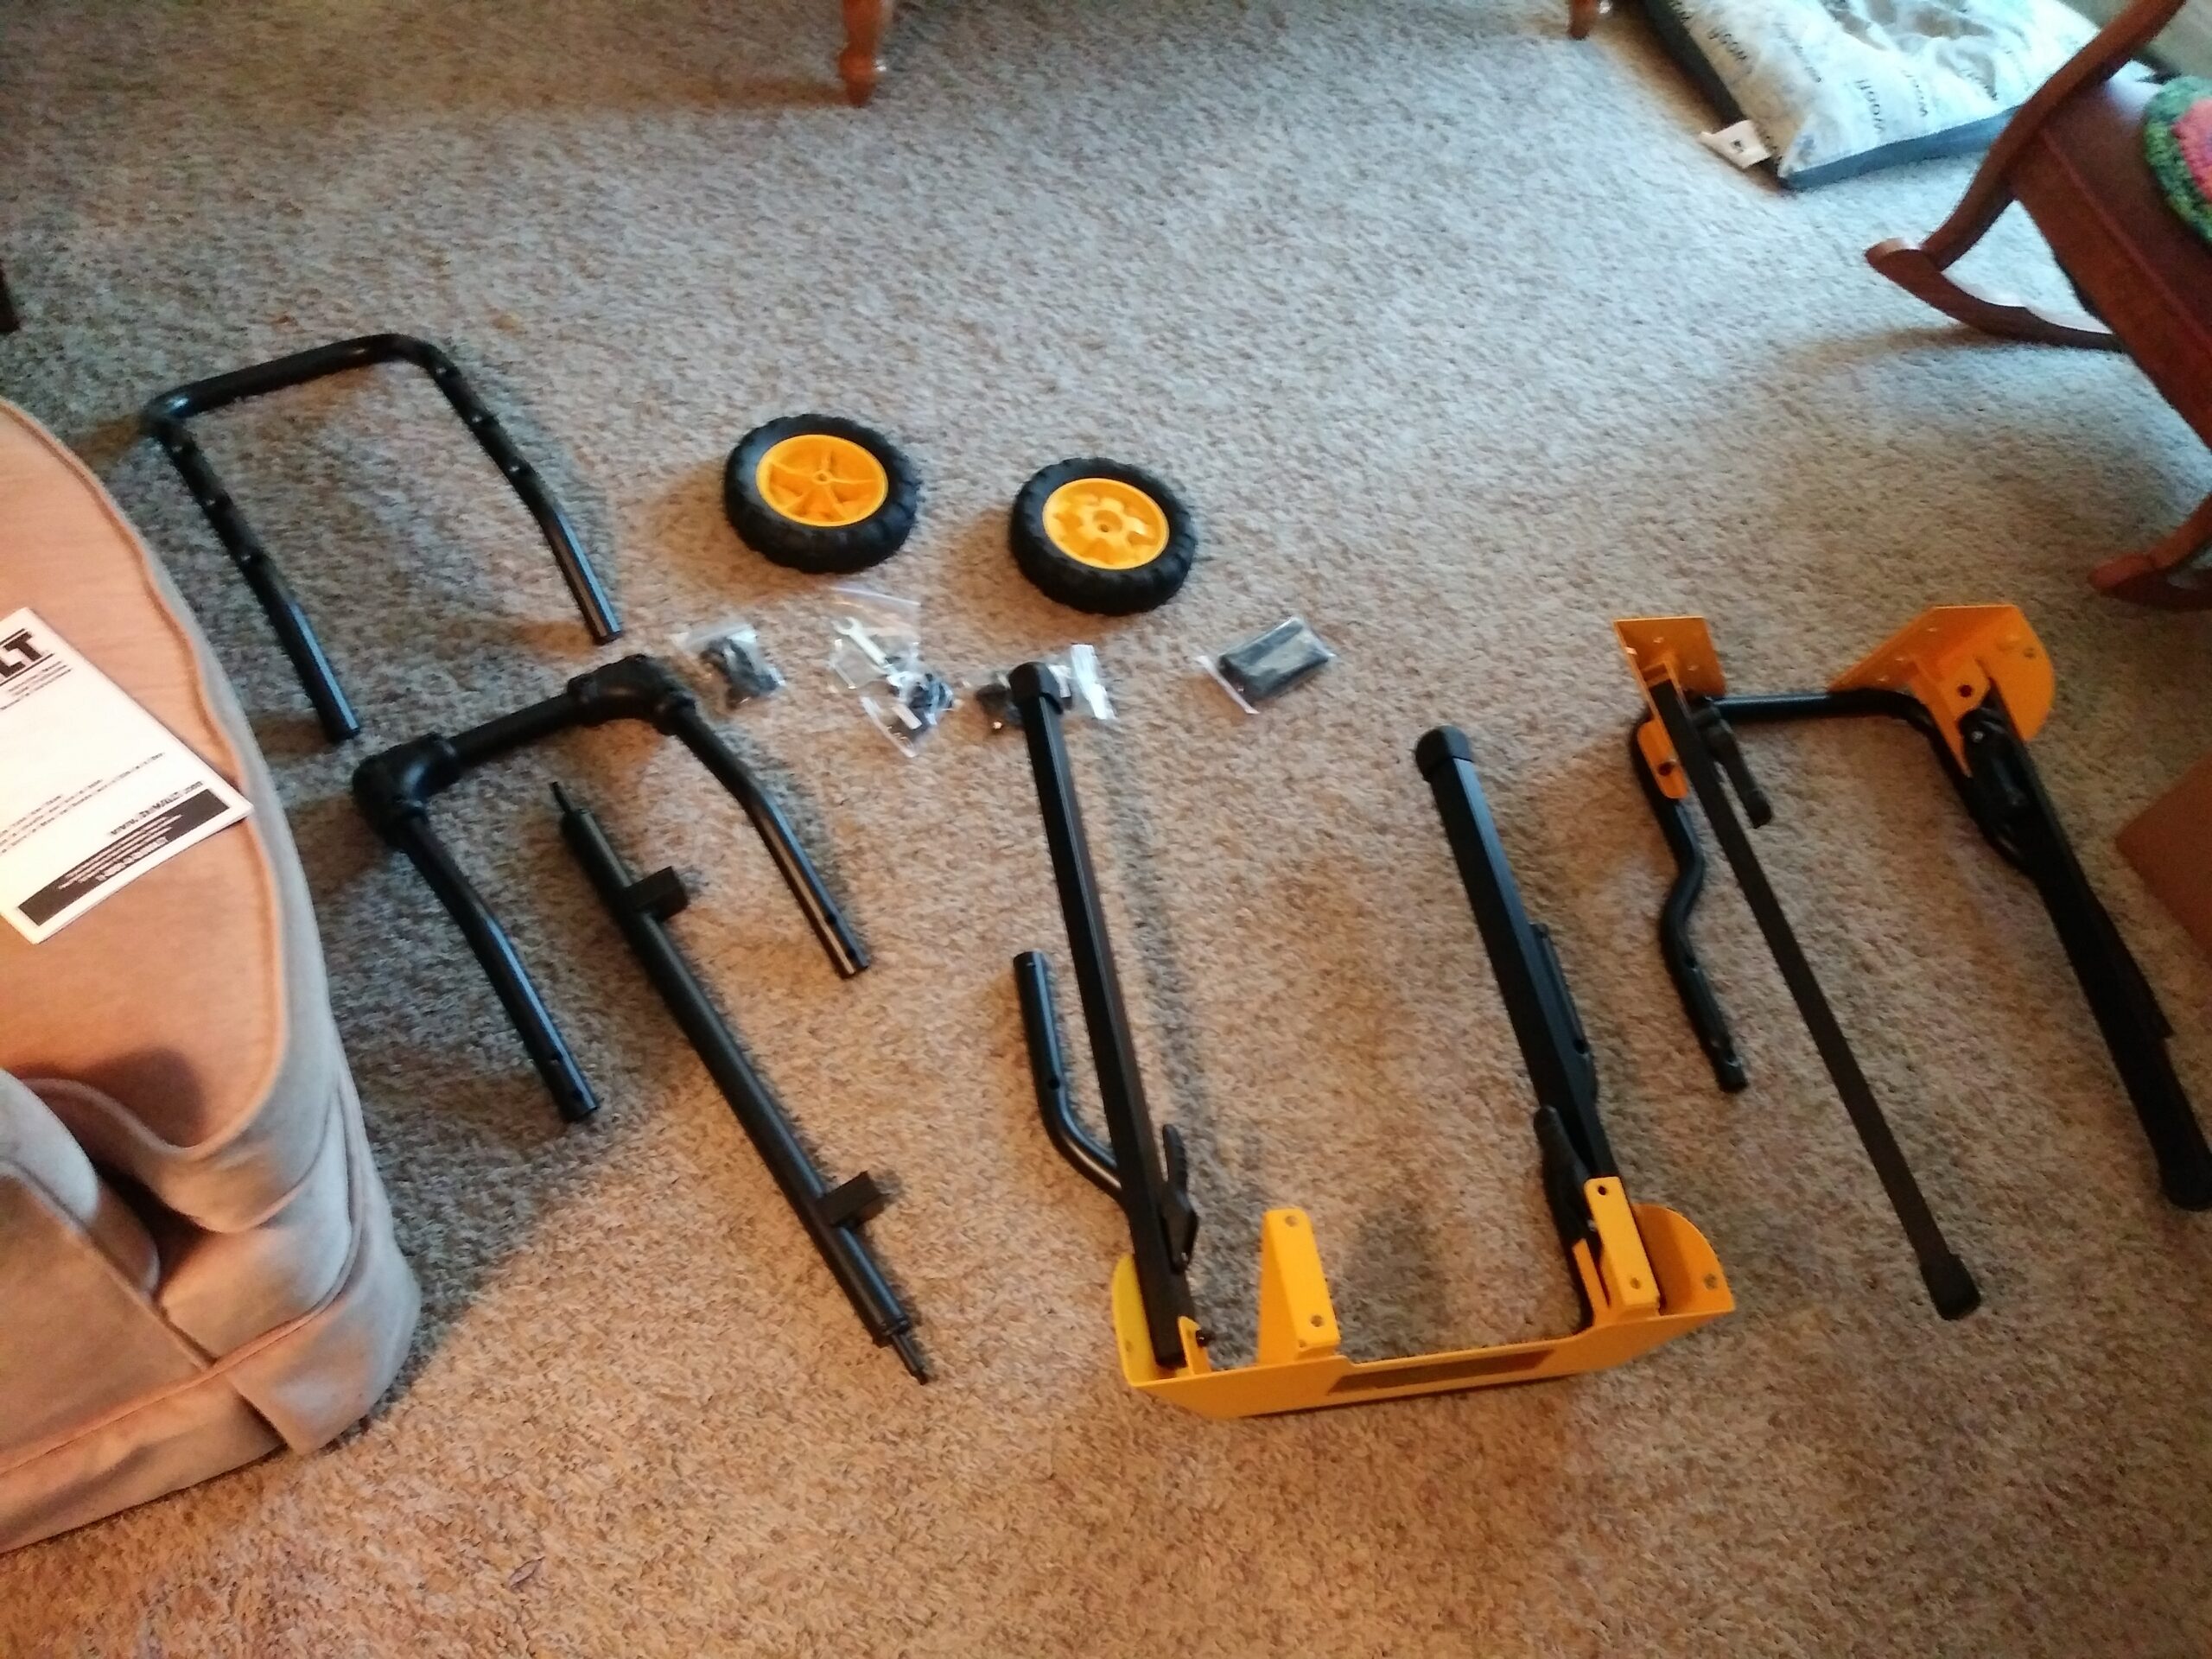
I got the special edition, which came with a rolling stand. The saw itself came pretty much ready for use. The stand came assembly-required.
Some assembly required. Some better instructions would be appreciated.
So, let’s start with the stand. It’s essentially a hand-truck with foldable legs, to which you can attach the saw casing. It’s a bit tricky interpreting the instructions, but I managed with only mild cursing. And getting the saw itself maneuvered into place to attach it to the frame is difficult, especially doing it by yourself. Don’t do it yourself. Get some help. Don’t be stupid like me. It wasn’t pride, merely impatience. Everyone else was out of the house at the time.
But when I got it assembled my opinion changed considerably. They really designed this stand well. It’s sturdy. It rolls well. The folding legs have large, well-placed latch levers that are easy to operate, and they’re strong enough to bear the weight of the entire thing as you stand it up. And once you get it set up you realize the full extent of their genius: the legs on the side facing the front of the saw are canted at a steeper angle than the ones in the back. They don’t stick out and trip you when you’re working in front of the saw. The ones in back are at a good angle to brace the saw as you push wood through it. It also places the work surface at a very comfortable height just above my waist level. Maybe I’m easily impressed, but it left me very hopeful. If they put as much thought into the saw as they did the stand I would be in for a treat.
Unfortunately it took me three months to find out. Yes, I saw a few things immediately while just looking it all over and making sure it had everything it was supposed to come with. They made it to be portable, and everything that could possibly fall off (with perhaps the exception of the miter gauge) has a storage spot on the chassis somewhere and won’t fall off easily. That will make it take more time to set up and take down, but I can live with that.
So as I said, this week I got to try it out. After positioning it in the proper spot (ie. not pointed toward anything I want to keep (still remembering that board that kicked back years ago and tried to give me an appendectomy), I got out the instructions and started setting it up. It takes a bit of practice. The blade guard assembly goes in quickly once you find where the release lever is, and learn how to line it up right in the receiver when you can’t see down past the throat plate very well. The anti-kickback device, in all its spring-loaded glory, is a bit tricky to get into place. The fence take a bit to figure out, but goes into place easily enough.
They tell you in the instructions that everything from the fence gauge to the skiving knife were already adjusted in the factory and shouldn’t need recalibration. As far as I can tell, they’re right. I haven’t seen anything to make me doubt so far. I’ve yet to try out the blade angle mechanism yet, but everything else seems to work just fine right out of the box.
The miter gauge feels a little cheap. I may look into something more solid at some point, but it works just fine for what I’ve been doing so far. The rip fence adjusts via rack and pinion mechanisms on both sides, and locks with a lever that is a little hard to find quickly, but otherwise seems solid. The fence measurement scale is not immediately intuitive, but works well once you figure it out. There’s probably something about it in the instructions, but I was too eager to get started at that point.
After ripping some slices off some scrap wood I tried out changing the blade out for a dado stack (My review of the Freud 8″ Dado Stack is here). I did have to buy a separate dado throatplate, but DeWalt makes one specifically for the saw (DWE7402DI). It sits a little lower that the tabletop, unfortunately, and impacted some of my test cuts by making the depth uneven when one end of the board was able to sink a little:
First time test cuts with the dado stack. Irregularities are as much operator error as deficiency in the equipment, though knowing about the throat plate being uneven with the table top helps.
UPDATE: My older brother read this and offered some quick advice. The throatplate comes with screws along both edges that can be adjusted to raise or lower how that edge sits in relation to the table top. I hadn’t even noticed, but it seems obvious now. Just another reason why I like keeping my older brother around.
Those four screws around the edge…turns out they’re important!
The specs say the saw will handle a 13/16″ dado stack. I got up to that when I got down to my project in earnest, ripping a 1.5″ dado in two passes. Every cut came out nice and uniform. I think my stack set will accommodate even wider, but I don’t think the arbor would safely take much more.
I will admit I don’t have much of a baseline for comparison, but so far I’m pleased with my experience. The saw seems well designed, and it offers features most jobsite saws don’t, like the rack and pinion fence adjustment. Or a fence, for that matter. The fence also works in about three different configurations for more convenient cuts, and has a flip-down extension for narrow cuts. The blade area is designed to pulls the sawdust down and out through a 2.5″ dust port in the back of the unit (I have a shop vac; I’ll have to try attaching it sometime), and seems to work pretty well. The wider dado cuts showered me with sawdust, but that may just be the nature of wide dado cuts. It’s still considerably less mess than using my circular saw, and most all of the sawdust was concentrated in the back.
The power switch is designed to make it very hard to turn on accidentally (and it is–if anything it’s too hard to turn on) and very easy to turn off. A quick slap of that section of the front chassis will connect with the switch enough to shut down. The blade stops fairly quickly, too (a few seconds).
Perhaps I’ve been working with circular saws for too long, but I was surprised at how quiet this saw is. Rather than the high-pitched screech of a circular or miter saw, it’s more of a low growl. It’s still loud enough to merit ear protection, of course.
In short, there is nothing cheap or flimsy about this saw. While I’m not experienced enough to speak to how precise it is, so far it seems to work well enough for what I’m doing–I’m not making complex cuts or ripping hardwoods or crafting to fine tolerances. Any errors I’ve seen so far are due to operator error, more than likely. Perhaps I’ll come back sometime in the future and provide an update, but so far I am pleased with my purchase.
I actually tried to order this saw late last year only to find it completely out of stock. Everywhere. I encountered that again in January when I first tried to order it–there were none to be found online, in brick-n-mortar or anywhere else (for less than an exorbitant markup, anyway). It was originally backordered into March or April, but I checked back a few weeks later and found some in stock. I pounced. It’s a very popular, highly rated model (currently 4.8/5, with 2639 reviews on Amazon). At $600 it’s on the high end of jobsite saws, but with the stand included I feel the value is there. It’s going to come in particularly handy later this year when I’m building some projects at the far end of the yard.
I discovered the website “The Art of Manliness” several years ago and enjoy dropping by now and then to see what they have to say. While much of it, obviously, is aimed at men, there’s a lot of it that is applicable to anyone, like a recent post in their “Sunday Fireside” series, titled “Blessed Are the Trail Maintainers.” It’s short, but here’s the most relevant section:
It is easier and sexier to start things, because novelty generates a neurochemical bloom of involuntary motivation. It is harder to sustain things when this cognitive cocktail dissipates — when the thrill of pursuit dulls into the mundanity of upkeep.
But the difficulty, the rarity – the chosen intentionality – of perpetuation makes the task all the more worthy, and valuable.
Ever seeking the not-yet-possessed, without caring for the already-obtained, is like drilling a mine that never breaks the earth’s surface; building a skyscraper that never rises above the ground floor; writing a story that never progresses beyond the introduction.
Brett & Kate McKay
It definitely feels satisfying to accomplish something new. It’s much less so when it’s something you finished some time ago–and still have to keep looking after it. It’s satisfying having 72-hour kits prepared for our entire family. It’s…less fun going through them every year to make sure the food hasn’t expired, the spare clothing still fits, nothing has leaked, etc. It’s nice having a well-tended yard, but not so fun keeping it that way.
And yet maintaining what you have is the essence of self-reliance. It’s keeping the tools sharp. It’s re-balancing your 401K. It’s rotating your food storage. It’s cleaning the garage. It’s identifying the things you no longer use and getting them to someone who will use them or getting rid of them. It’s not just noticing that the stopper that shunts the water from your bathtub faucet to the shower head is getting old, but actually making a to-do item to replace it… (Speaking of which… one moment, please! Okay, done!) …and then following through (Oh.).
Self-reliance can be sexy. I’m still rather proud of my nice new water storage stack. But that will fade. And when it comes time to check it and replace it it probably won’t be so fun. Becoming self-reliant may be sexy, but remaining self-reliant will likely become work. But it’s the maintaining that matters. What good is having food storage if, when you really need it, the flour is full of weevil, or you find moisture has gotten to your cans and rusted some of them through? What good is learning how to change your own oil if you never do? Or building a new fence and letting it fall into disrepair?
Everyone loves a trailblazer. But it’s the trail maintainers who keep the trail worth taking.
As discussed here and alluded to here, we finally decided to do something about our inadequate water storage. Fifteen gallons just won’t cut it for four people and three pets in any serious situation. I’d been looking into various options for some time, but finally decided to pull the trigger and get something.
I looked at large-capacity storage tanks (ie. 50 gallons + in a single big container). I looked at small-capacity storage. I discussed the merits of Water Bricks with my brother, who has been using them for a while for their storage. And over time I came to some conclusions. When we got water storage containers, they had to be:
5 gallons or less so they can be carried easily to wherever they are to be used
made to take spigots to make dispensing easier
made of high density polyetholene (HDPE), and opaque for best storage and durability
airtight
inexpensive
I finally settled on Saratoga Farms’ 5 gallon stackable containers. I did consider Water Bricks, as their design allows for taller and more secure stacking, but I’d been warned by my brother that they can leak, and they’re designed to be stored sideways, which only encourages leakage. Perhaps I’ll invite him to do a guest review on his and how they’re performing. Ultimately the biggest deciding factor was price. For the amount of storage we purchased, we would have spent about a third more for the same volume in Water Bricks.
So we ordered them online, only to find they would be shipping from a local company not more than a few miles from our house. We prefer to shop local, but had already discarded that business, as their prices were too high by comparison. I wasn’t sure why they’re so willing to undercut themselves on Amazon, but that’s their business model, I suppose. Since then I’ve found another company selling the same containers on Amazon, also at a lower price, so I guess they needed to be competitive. But why they couldn’t lower their local price accordingly, I don’t know. They offer free shipping on Amazon, so had they sold at a similar price locally I would have saved us some time and them some money.
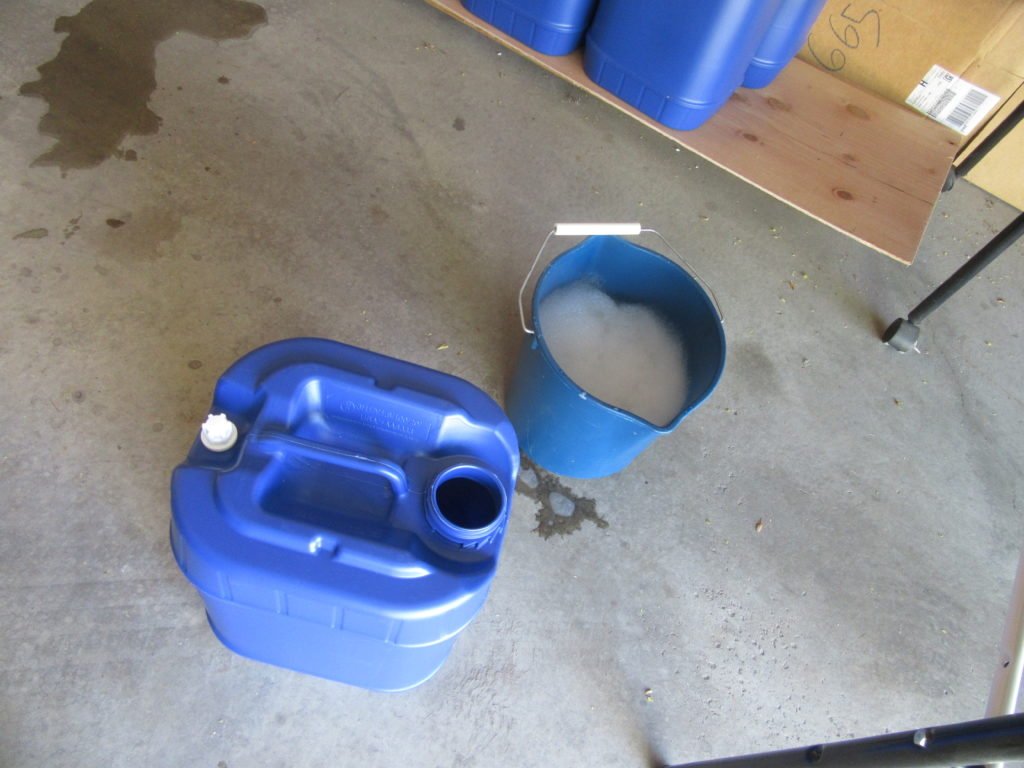
An empty container, pre-rinsing
The order arrived earlier than expected–always a plus. We had another order scheduled to arrive that day, so we thought it was the other order until a few hours later when the expected order arrived. That evening we unpacked the containers and put them in their expected destination until we had time to fill them.
That time was this weekend. My wife and one of my sons helped. I had heard that the containers seal better if washed first, and since they ship with no lids on it was probably safer to at least rinse them. Someone in the comments recommended filling a separate container with warm water and dish soap that you could then pour into the containers to swish around to clean them, as putting dish soap directly into the container itself would cause lots of foam and take a lot longer to rinse out. I may have put too much dish soap in the bucket I filled, but every container created a lot of foam when I started shaking it around. It did rinse out without much trouble, though.
The wash bucket
It might not have been the best idea, but for rinsing out the soap before filling I added some water, swished it around again, and then dumped it out on the lawn. My front lawn isn’t the greatest to begin with, though, so it it probably won’t make a difference.
To fill the buckets, I bought a fresh, clean hose just long enough to reach from the faucet to the containers. I intend to use this hose for nothing but filling water containers in order to keep it as clean as possible. Our house is on city water, which is chlorinated. Though the company that makes the containers suggests buying their water purifier solution, all the sites I checked (FEMA, ReadyUtah.org, etc.) all say that chlorinated city water is sufficient and should last at least six months to a year.
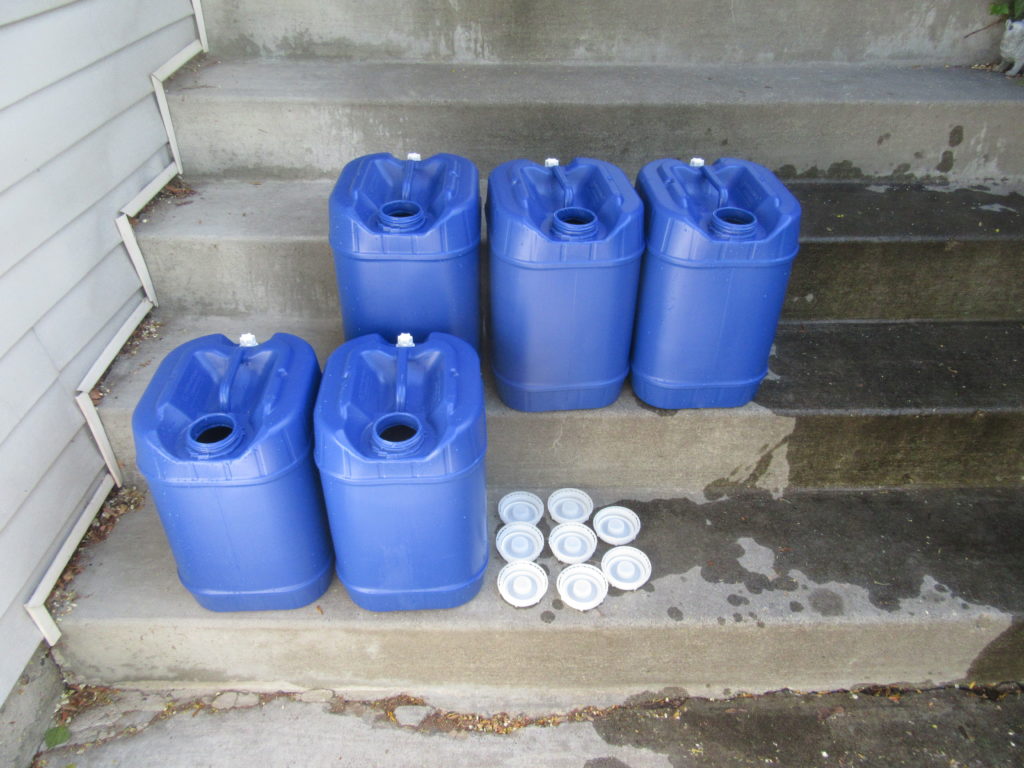
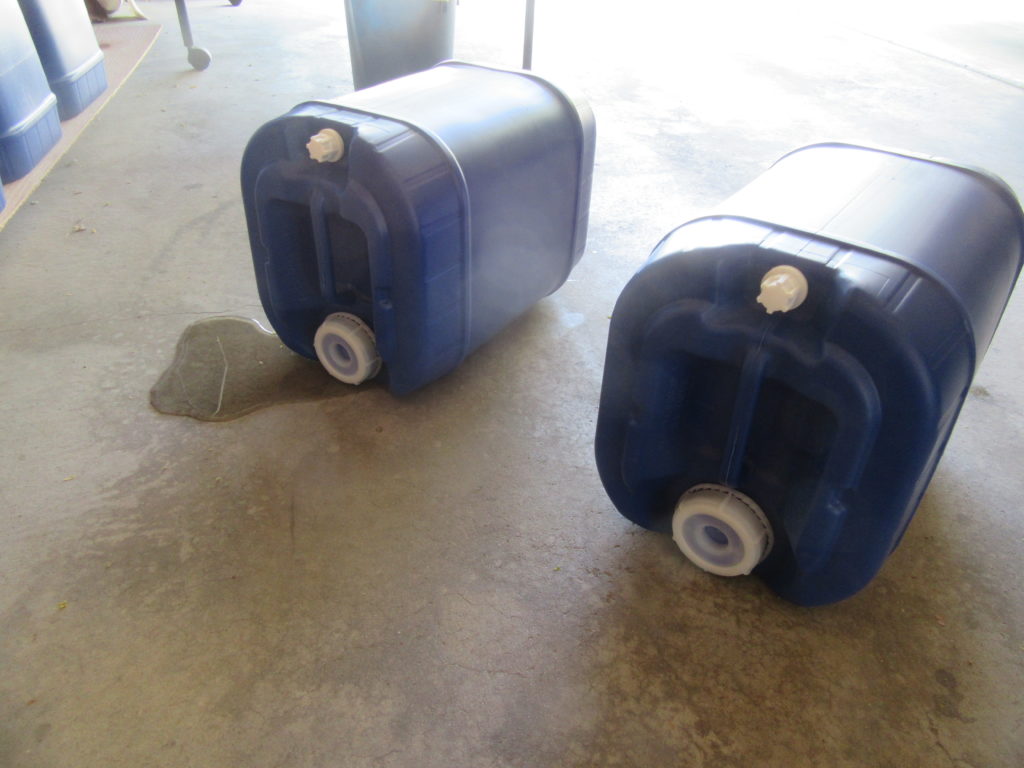
Containers during rinse and fill
Filling the containers didn’t take as long as I expected. We were able to fill one in a couple of minutes. From there we put on the cap. The caps that came with them have extra bands around the outside that ratchet against the opening on the container to keep the lid on tight. To open the containers you’ll have to tear the band off, similar to the caps on milk jugs.This implies the lids are not intended for reuse, though I can’t imagine there being any problem with it. The containers we already have been using are reusable and have given us no trouble.
Once each jug was capped I tested them to check for leaks. Here we ran into trouble. The very first container I tested dripped from the cap at a pretty steady rate. The second sealed just fine.
Signs of a leaking cap
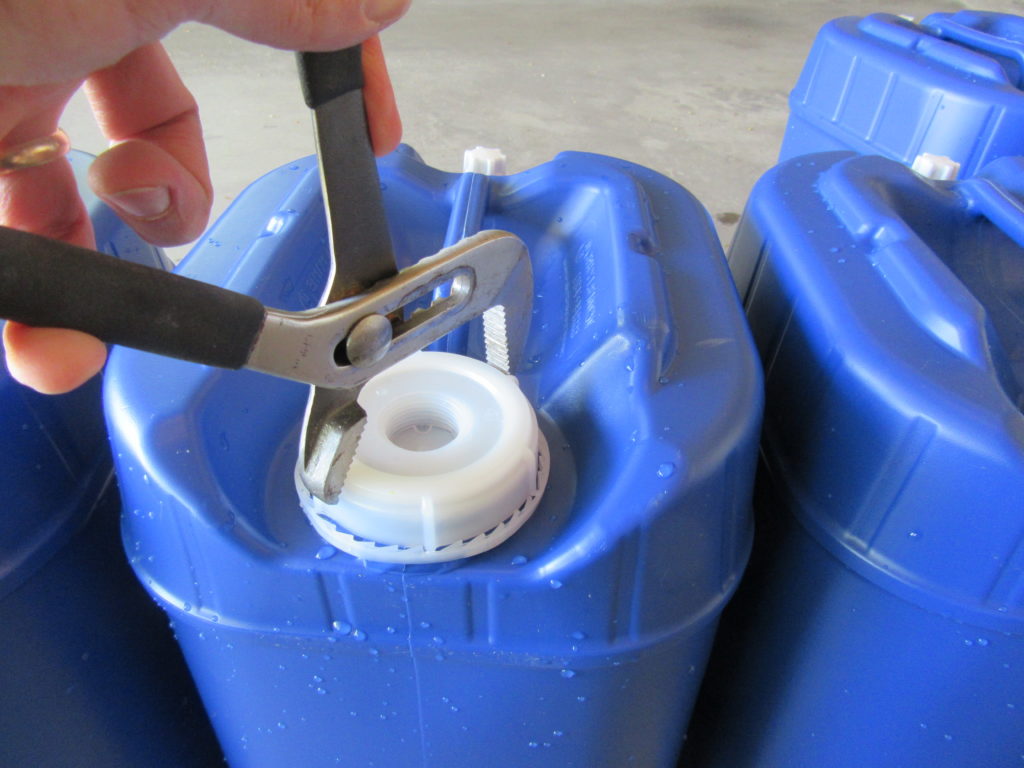
As it turned out, close to half of them leaked. I had read in some of the reviews that the caps had to be really tight before they would seal, but other reviews insisted that you wouldn’t need the wrench they sold as part of a starter kit (which they were out of when I ordered them) and most people could hand-tighten the caps without any trouble. I’m only 135 lbs, and don’t lift, so I guess I don’t qualify for “most people.”
Stre-e-e-e-e-e-tch those pliers!
After several attempt to hand-tighten the caps (often I could go back after I’d already tightened the first time and tighten them a little more) I decided to see if by any chance my channel lock pliers would open wide enough to fit the caps. The fit–just barely–and I found I was able to tighten each lid at least another five or six clicks beyond what I could do by hand. That seemed to be tight enough, finally, and I didn’t have any more containers that leaked.
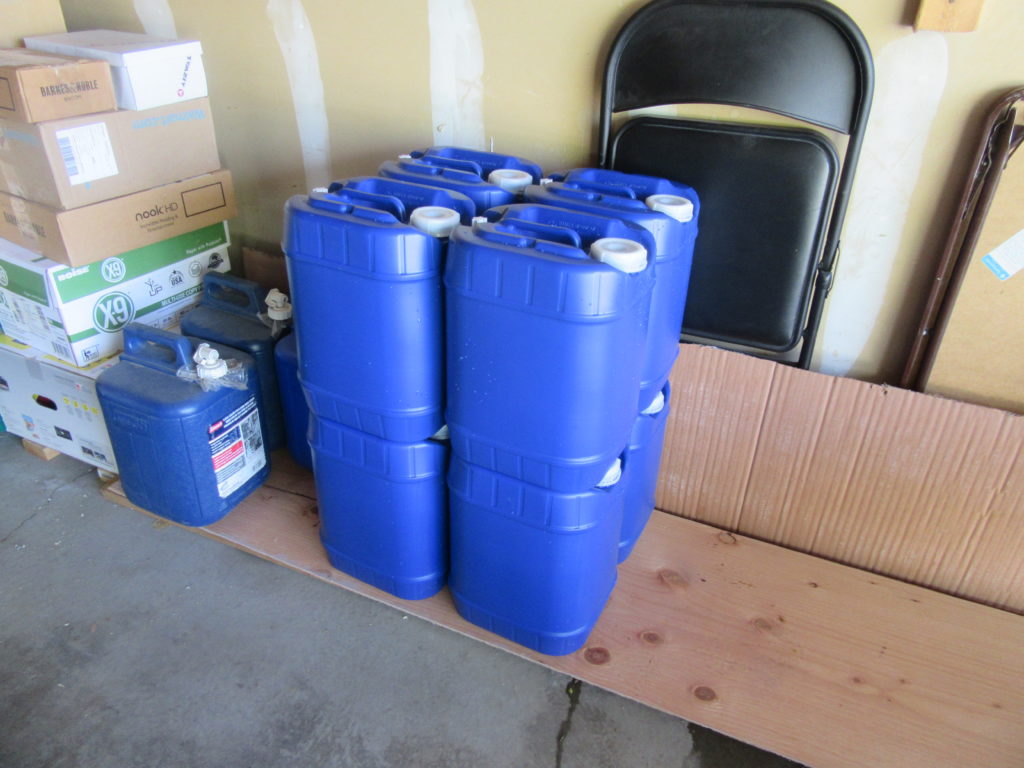
Finally I was able to place the containers in the location I had prepared. I’ve heard from several sources that plastic containers react with concrete floors, leeching chemicals into the water. I’ve also found sources contesting that assertion. In my case I chose not to take chances, plus it’ll keep the containers cleaner if they’re not right on the floor. I laid down some two-by-fours and a section of old wall board on top of that to provide a slight base just wide enough to stack two containers next to one another. The containers are 10″ x 11″, and 14″ tall, and designed to bear the weight of additional containers on top.
Yup, they stack! My old ones (seen on the left)…don’t.
When stacked like this they really to store efficiently. I’m not sure I’d trust the caps enough to store them on their sides, at least not in an area that doesn’t take water leakage well, but upright like this they should be just fine. It’s recommended you store them in a cool, dark place. I’m not sure that’s as critical with the right containers. Sunlight encourages algae growth, and cooler temperatures tend to preserve most things better, but we’ve stored water in the containers on the left in our garage before, and the water was fine for several years at least.
The key is when you go to use the water, check for two things. First, is there anything floating on top the water when you open the cap. That’s bad; the water grew bacteria. Second, smell the water. If it stinks, don’t use it. If it just smells stale it’s fine. The air in water tends to separate out over time, so when you go to use it you might want to add air back in by pouring it into a sealable container and shaking it up, stirring it well, or some other means of aerating it.
The long-term viability of these containers is yet to be seen, of course, but so far I’m satisfied with the investment. The difficulty in getting them to seal was frustrating, but otherwise they function pretty much as advertised. They are a little heavy to lug around, but the handles are comfortable, so getting them from their storage location to our kitchen to use shouldn’t be an issue. Even I’M not that wimpy!
I will test the water quality in about six months, and then a year, and see how it goes. If there’s a problem I’ll write a follow-up review and/or update this post. But I will admit that I feel better knowing we have a good amount of water on hand should we have any more quality issues with the city system or should we get hit with a worse earthquake (though that in itself might reveal some other issues, such as whether the containers are durable enough to handle falling over without rupturing or compromising the seal).
All in all, these containers seem to be a good storage solution at a decent price. Most containers seem to sell for at least $20 – 25 for a 5-gallon unit. With some bulk pricing these came to close to $17.75 or so. It’s a little pricey for something so simple, and there may be cheaper solutions (like the larger barrels or tanks), but over-all I don’t think it’s too much to spend for peace of mind.
UPDATE – May 8, 2020 – I got some more containers from another source that included a wrench. I also got a back-ordered wrench from the first source that I didn’t realize was coming. It’s time for the Battle of the Wrenches!